- INTRODUCTION
- PHONE/TABLET HOOKUP DIAGRAMS
- BETTER GALLERY TALKS AND INTERVIEWS
- ADAPTERS
- MICROPHONES
- HEADPHONES/MONITORING
- DIGITAL INTERFACES - ANALOG & DIGITAL MIXERS
- SETTINGS-ANDROID
- SETTINGS-IOS
- SMART PHONES AND TABLETS (ALL)
- AUDIO
- VIDEO
- COLLABORATING WITH OTHER MUSICIANS
- ZOOM
- VIDEO CALLING PLATFORMS
- FACEBOOK LIVE
- STREAMING
- ADMINS ONLY
There's a good chance that live streaming and on-line concerts won't go away any time soon, and this is a great opportunity for musicians to 'up their tech game' and meet the challenges of audio and video recording and streaming at home and of virtual collaboration head on.
There are an unending stream of 'how to' videos and other presentations available on the web, as organizations and individuals scramble to find out how to survive in our new reality. Some of them are very good, but others are not, and are filled with misinformation and solutions born from inexperience and a wish to get a product out quickly.
The following collection of FAQs has been put together by Jerry Kornbluth (the audio guy) with input from James Venable (the video guy), who together, for a number of years made up the Jazz on J Street 'Stream Team' that live streamed their monthly jam Sessions and other events to the world. It's their desire to share the knowledge and the insights that they've gained over their long careers as Audio and Video professionals with you. Hopefully, it will make your excursion into the technical 'unknown' just a bit easier, and offer more professional results.
Remember one important thing going forward... If what you're doing seems hard, then you're probably doing it wrong. By following the suggestions in these FAQs you can expect to greatly increase the quality of your audio and video recordings and finished collaborations, and to accomplish your goal with less stress and with a very modest financial investment, by approaching your project the easy, professional way.
If you've got suggestions, comments, or questions, please email jerry@ajrecording.com
COMPLETE TECH TALK FAQ |
||||
Introduction
|
||||
Phone/Tablet Hookup Diagrams
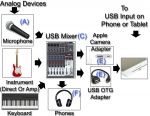
Connecting Analog Devices To Phones And Tablets With 1/8" Headphone Jacks
These are the links that are referenced in the connection diagram.
Use them to access for specific suggestions on which microphones to get, and adapters you'll need to connect your microphone or instrument to your phone or tablet.
(A) - MICROPHONES
(B) - ELECTRIC INSTRUMENTS
(C) - XLR ADAPTERS
(D) - 1/4" ADAPTERS
(E) - SMART PHONE/TABLET ADAPTERS
(F) - HEADPHONES/IN EAR MONITORS
IMAGES |
|
|

Connecting Digital Devices To Your Tablet Or Smart Phone Using A USB Connection
These are the links that are referenced in the connection diagram.
Use them to access for specific suggestions on which mixers to buy, and which adapters you'll need to connect your mixer or USB Microphone to your phone or tablet using a USB connection.
(A) - MICROPHONES
(C) - USB MIXERS
(D) - USB MICROPHONES
(E) - SMART PHONE/TABLET USB ADAPTERS
(F) - HEADPHONES/IN EAR MONITORS
IMAGES |
|
|
Better Gallery Talks and Interviews
Wireless Microphones (and Adapters) For A Professional 2 Person Gallery Talk Or Interview
Newer smart phones and tablets have exceptional cameras, and are a great way to stream gallery talks, interviews and other one on one events.
While holding a smart phone 10 to 20 feet from someone in a gallery might generate great video, it won’t yield intelligible audio at that distance. (no microphone can do that)
The only effective solution to good audio in this situation, is to use wireless microphones with your smart phone or tablet.
Fortunately, for a bit over $100 you can get all the gear you’ll need to make your next gallery talk or interview look, and sound like you’re a pro.
Here's the microphone and the adapters you’ll need.
MICROPHONE
No matter what smart phone or tablet you have, you'll need a battery operated wireless microphone set that includes 2 lavalier microphones and a single receiver LIKE THIS ONE for $94.99.
YOU'LL NEED THESE 2 ADAPTER FOR ALL SMARTPHONES AND TABLETS:
An 1/8" (3.5mm) plug to 1/4" (6.35mm) jack adapter LIKE THIS ONE for $8.99.
And a 'break out' adapter LIKE THIS ONE for $9.99.
IF YOU HAVE A NEWER IPHONE OR IPAD, OR OTHER DEVICE WITH A LIGHTNING CONNECTOR, YOU'LL ALSO NEED A 3RD ADAPTER:
A lightning connector to 1/8" (3.5mm) TRRS Jack adapter LIKE THIS ONE for $20.00, so that you can use the breakout connector above.
HEARING WHAT YOU'RE STREAMING
Add any set of earbuds with an 1/8" (3.5mm) connector to the list, and you’ll be able to hear what your audience will hear and adjust for any issues.
HOOKING UP YOUR NEW GEAR:
1) The 1/8" to 1/4" adapter goes on the microphones receiver's plug
2) The now 1/8" plug from the microphone receiver plugs into the 1/8" microphone jack on the breakout adapter (marked with a picture of a microphone)
3) Your earbuds plug into the 1/8" headphone jack on the breakout adapter (marked with a picture of earphones)
4) The breakout adapter plugs into your smartphone or tablet combo jack (or into the lightning adapter and then into your phone, if required)
I’d recommend taping adapter connections together with masking tape so that they won’t come loose while you’re streaming.
Adapters
What Adapters Will I Need To Connect My Devices? (Overview)
There are a few sub-questions to this topic which will help to narrow your specific suggestions down a bit.
The first 2 are:
1) What device are you trying to connect from? (A wired microphone, a Direct Box or instrument directly, an amplifier, an analog Mixer, a USB device (An audio interface or a mixer with a USB output)
2) What device are you trying to connect to? (A new iPhone, an older iPhone, a new iPad, an older iPad, an Apple computer or laptop, an Android phone or tablet, a PC computer or laptop)
The next question is related to the first. You'll need to know what type of output connector(s) are available on the device you're trying to connect FROM, does it output a microphone level audio signal or a line level audio signal (much louder then microphone level), and is the output monaural (one channel, or stereo (two channels)?
MICROPHONES
Almost all microphones are monaural output devices and they almost always output a microphone level signal. Most will have either Male XLR, 1/4" or 1/8" (3.5mm connectors.
INSTRUMENTS
Instruments audio outputs can either be connected directly to your phone or tablet, or through a direct box that allows for a simultaneous connection to an amp. You can also connect to your device from the 'thru' connector of your amp if it has one. Most will have 1/4" jacks for output, but some may have XLR male or 1/8" (3.5mm) jacks.,
MIXERS
Most mixers usually have a left and a right output which is usually at line level. Depending on the mixer, and the on device that you want to connect to, you may have to include an adapter to lower the line level signal to a microphone level signal so that your audio does not distort, but don't even think about that part right now. Most will have either 1/4" TS, 1/4" TRS or XLR connectors
USB DEVICES
There are many devices available that include a built in USB (digital) audio output. These include microphones, audio interfaces, audio mixers and webcams. In some cases, they make it easier to connect your device to your computer, tablet, or smart phone, but that's not always true, and USB is certainly not the only way to connect your devices. These will usually have a USB Female connector.
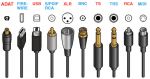
HINTS
If you're not sure about the output connectors, or output levels of your device, you can find the answers in your equipment manual. Don't have the manual? No problem, just do a search on line and you'll probably find it. There are images lower on this page showing most of the standard connectors.
Whatever solution you decide on, tape all non locking adapter connections together when practical. Also, tape them down to relieve strain on the adapter cables. You don't want them to slip apart as you're working.
And make sure to use short jumper cables or adapter cables when connecting to the jacks on your input or output devices. The strain of a heavy adapter on a connector can break the connector, adapter, or both.
GOING FURTHER
Input Devices: IPhones IPads And Android
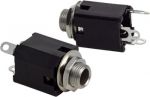
Output Devices With 1/4" Output Jacks
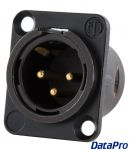
Output Device With An XLR Connector For Output Connection
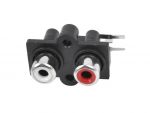
Output Devices With RCA Jacks For Output Connection
Connecting Your Mixer/audio Interface Or USB Microphone To A Tablet/Smart Phone/Computer Via USB
Connecting Your Instrument Or Keyboard To Your Device
IMAGES |

Input Devices: IPhones IPads And Android
OLDER IPHONE OR IPAD, OR AN ANDROID PHONE OR TABLET
If you're trying to connect your audio output device to an older iPhone or iPad, or an android phone or tablet with an 1/8" (3.5mm) combo jack for connecting a pair of headphones, and/or a microphone, you'll need a break out connector LIKE THIS ONE to convert the single combo headphone/microphone jack into 2 separate jacks. One jack for your microphone and a separate jack for your headphones.
NEWER IPHONE OR IPAD WITH A LIGHTNING CONNECTOR
You'll need a lightning connector to 1/8" (3.5mm) TRRS Jack adapter LIKE THIS ONE so that you can use the breakout connector above. (Sorry, I couldn't find a 1 adapter solution.)
Output Devices With 1/4" Output Jacks
If you've got an instrument, a microphone or a mixer with a 1/4 output plug or jack then you'll also need a size adapter cable LIKE THIS ONE to accommodate the 1/4 inch connector size. You'll also need a 1/4" male to 1/4" male or female cable of an appropriate length to reach from your output device to your input device.
Output Device With An XLR Connector For Output Connection
If your microphone or amp has an XLR connector (usually male) you'll need an 1/8" 3.5mm) male to female XLR adapter LIKE THIS ONE to connect to the microphone, in addition to any adapters you need to connect both a microphone and headphone to your particular smart device.
You'll also need an XLR Male to Female cable of an appropriate length to reach from your microphone to your smart device.
Here's another adapter, found by Meri Ziev's husband Arthur, that goes directly from your smart phone TRRS to an XLR Microphone and Headphones, so you eliminate one adapter. Movo-TCB2 (This adapter seems to go in and out of stock with various suppliers, so you may have to search for it on Google.)
Output Devices With RCA Jacks For Output Connection
If your device has RCA output connectors (usually 2 female connectors 1 for the left channel and one for the right channel) you'll need a 1/8" 3.5mm) male to dual RCA female adapter LIKE THIS ONE to connect to the output device. You'll also need a dual RCA male to male cable of an appropriate length to reach from your output device to your input device.
Connecting Your Mixer/USB Audio Interface Or USB Microphone To A Tablet/Smart Phone/Computer
Any computer with a USB A Female input doesn't require an adapter to connect your device's USB output to the computer)
For iPhones, iPads, and android devices there are a number of adapters for this purpose that are dependent on your device's requirements.
A majority of Android smart phones & tablets support a feature called USB OTG (on the go). With a USB OTG cable, you can connect your android smart phone or tablet to other devices. The cable has a connector for your phone on one side and a USB-A Female connector on the other side.
To check if your android device is OTG compatible you can download this FREE OTG CHECKER from the app store (and then uninstall it after the check) https://play.google.com/store/apps/details?id=com.app.usbotgchecker&hl=en_US
Note that many adapter manufacturers use the term OTG for iPhone and iPad adapters as well.
Note that some USB output devices require more power then your input device can deliver over the USB connection. In this case you can use a powered USB hub LIKE THIS ONE
Or, LIKE THIS ONE that connects directly to a USB C port (Macbook/Pro, Chromebook, etc.).
Also note that many Android devices (especially older ones) have limited or no USB support. If you think that's your issue, then check out the Audio Evolution mobile extreme USB driver HERE Their driver comes packaged in a simple to use audio editor and they've also got a iOS version.
Here's a list of adapters. If you're device isn't listed, do a Google search with your device's name and OTG or USB A Female.
iPhone 11 X 8 7 6 Plus iPad Air Pro Mini - USB A Female OTG Data Sync Cable LIKE THIS ONE OR LIKE THIS ONE
MacBook Pro/Air 2019 2018 2017, Samsung Galaxy S20 S20+ Ultra Note 10 S9 S8 Galaxy Tab A- USB C ( also called Thunderbolt3) to USB A Female OTG Cable LIKE THIS ONE
Micro USB male to USB A female (OTG) adapter LIKE THIS ONE
Samsung Galaxy Note 3 N9000/N9005 Galaxy S5 Nokia Lumia 2520 Tablet Samsung Galaxy Note Pro 12.2 /Tab Pro 12.2 - USB 3.0 OTG adapter LIKE THIS ONE
USEFUL LINKS |
| HOOKUP TUTORIAL (FOR ANY MIXER OR AUDIO INTERFACE WITH A USB OUTPUT) |
Connecting Your Instrument Or Keyboard To Your Device
Whether you’re using iPhone, iPad, or Android device, if you’re connecting an external sound source to your microphone input, your device expects the volume to be that of a microphone. The output level of a microphone is a great deal quieter then the output levels associated with most electric keyboards or the output of your guitar or bass amp.
Unless you can lower your instrument's output volume substantially (either by a volume control built into your instrument, or by using an external device) , when you connect a keyboard, amp, or any other headphone or line level audio signal directly into the microphone input of your device, 1 of 2 things can happen:
1) the device’s audio circuitry can be overloaded and produce very distorted sound, or,
2) the device’s automatic gain (volume) control circuitry will attempt to reduce the incoming signal volume, and again, produce distorted sound.
Since most phones and tablets don’t offer an easy, or sometimes any way of reducing the incoming signal level sufficiently, the easiest way to remedy the issue is by use of external attenuating devices. These will convert the output signal to microphone volume before it ever gets to the device’s microphone input.
There are many different Direct Boxes and adapters that can accomplish this task, and your choice will depend on your preference, and the type of connectors that you’re dealing with. These Direct Boxes and line to mic level adapters can be connected at the output of your sound source or nearer to the input of your phone or tablet. Try to match the connectors with your system where possible to eliminate the need for extra adapters. Just don’t put a lot of weight or strain on your device’s input or output connectors. Use a short jumper or adapter cable to get from the device connectors to your line to mic level adapter in those situations.
Here are some Direct Boxes and line to microphone level adapters you might want to look at:
LINE TO MIC ADAPTERS
Line-Level Audio Plus Monitoring Adapter for iPhone & Android phones
Pro Co Sound LMX In-Line Barrel XLR Mic to 1/4" Line Level Adapter
Mono Attenuator AAM25L Line to Mic Level 1/4" Jacks
Stereo Audio Attenuator 40dB convert from line to mic level - RCA Jacks
Remote Level Controller - RCA Jacks
Inline Volume Control Audio Cable 1/8" (3.5mm) Stereo Male to Male - Untested But Might Work
Hosa ATT-448 Adjustable Attenuator, XLR3F to XLR3M
Whirlwind IMP-AD40 Fixed 40db Attenuator, XLR3F to XLR3M
DIRECT BOXES
Whirlwind IMP 2 Standard Direct Box
Livewire SPDI Passive Direct Box with Attenuation Pad
Pyle Passive DI Unit Hum Eliminator with Attenuation Pad
Microphones
How Do I Pick A Good Microphone? (Overview)
There are hundreds of microphones in the marketplace all suggesting that they are the perfect microphone for you. For this discussion, let's not look at any microphones that are over much over $100 and focus on those that have become industry standards. (I'm not including many USB microphones, because, with a few exceptions listed here, I don't believe that they always offer enough flexibility and bang for the buck. Also, many microphones come with a model that has a switch built into them. DO NOT BUY THE MODEL WITH A BUILT IN SWITCH. At some point, it will bite you.
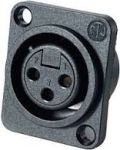
CONNECTORS
All professional microphones have an XLR male connector.
USB Microphones have a USB Connector and interface directly to many input devices.
BASIC TYPES OF MICROPHONES
Microphones can be separated into 3 general groups.
1) Those that require a power source to operate. They must either be externally powered by the phantom power on your mixer or audio interface, (Condenser microphones and some Electret microphones) or powered by a battery pack (some Electret microphones and some wireless microphones).
2) Those that do not require a power source to operate (Dynamic microphones)
3) USB Microphones that interface directly to many input devices.
The next thing that separates microphones is their polar pattern. This measures how well the microphone “hears“ sound from different directions. The most common types of directionality are: Omnidirectional (Hears equally well in all directions), and Cardioid (Hears mostly from the front of the microphone, and very poorly from the side and back) and Figure 8 (Hears equally well from 2 opposite sides of the microphone).
For most uses, I would recommend Dynamic Cardioid pattern microphones (an exception are the USB microphones listed under USB microphones). Dynamic microphones are rugged, they are not super sensitive to very loud sounds, they don't require external power, and there are many in our price range that sound great.
If you already have a microphone that you are happy with, then don't go out and buy as new one, just because it's on my list. Just use yours (with appropriate adapters if necessary) and have at it, otherwise, choose the FAQ that best suits your needs for some recommendations.
GOING FURTHER
USB STUDIO QUALITY LARGE DIAPHRAGM CONDENSER MICROPHONE
USB MICROPHONE FOR VOICE PRESENTATIONS, INTERVIEWS, READINGS, ETC.
GENERAL PURPOSE MICROPHONES (Vocals, Wind and string instruments, acoustic guitar, spoken word)
DRUM MICROPHONES
ACOUSTIC PIANO MICROPHONES
BRASS INSTRUMENT MICROPHONES
MICROPHONE STANDS
MICROPHONE CABLES
MICROPHONE PLACEMENT
USB Studio Quality Large Diaphragm Condenser Microphone
There are many out there to choose from, but this one has been recommended very highly by Rupert Ziawinski, a really great Bass player and college music Professor at both Broward and Miami Dade College.
If all you will be recording is a microphone and/or one instrument at one time, this might be the solution for you. Take a look at the Samson G-Track Pro Professional USB Condenser Microphone with built in audio interface.
There's no XLR output, it's USB only, but in addition to a being a good quality, large diaphragm condenser microphone with switchable polar patterns, it's got a 1/4" instrument input for connecting guitars or other line level devices, a headphone jack (with level control), and it features a built in mixer so that you can adjust the levels between your voice and your instrument, and it can be switched from monaural output (microphone and instrument on the same channel), and 2 track output, (microphone and instrument on separate channels).
NOTE: You'll need a powered USB hub LIKE THIS ONE and an appropriate OTG adapter to use this microphone with a smart phone or tablet.
You might also want to consider investing an additional $30 (renewed for $20) in a Microphone Spider Shock Mount Mic Holder to isolate the microphone from your environment and mount it on a mic stand.
Wired And Wireless USB Microphone For Voice Presentations, Interviews, Readings, Etc.
This USB Plug and Play (PC or Mac) USB directional (cardioid) Wired Lavalier Lapel Microphone is everything you'll need to sound like a pro on your next presentation, reading, or interview or gallery talk. Its really inexpensive at $17.99 including prime shipping, It sounds better then it should for anything in that price range, and the single, wired version of this microphone is a directional (cardioid) microphone, which means it will focus on your voice, and it won't pick up a lot of room noise and other sounds from the back and sides of the mic. Fir more flexibility, choose either the singal or dual wireless lavalier microphones
Here's the Amazon Link to the wired version of this microphone.
Want to go wireless for extra flexibility: Here's the Amazon Link to the wireless version of this microphone for extra flexibility.
Rather have a 2 microphone wireless setup for an interview situation? And here's the Amazon Link to the dual wireless version of this microphone
If you're going to be using these microphones with a mac PC or smartphone that doesn't have a USB A Connector, Check out the adapter section of these FAQ's, here.
General Purpose Microphones (Vocals, Wind And String Instruments, Acoustic Guitar, Spoken Word)
Shure SM58
Sennheiser E835
Drum Mics
Overheads Shure SM57 (1 or 2 mics)
Kick AKG D112 MkII (Oops $170)
Acoustic Piano
MXL Mics 770 Cardioid Condenser Microphone if you have a mixer or audio interface that supplies phantom power (or the power supply listed below) a lot of reviews rate this $70 microphone as really good for piano
Shure SM57
48V Phantom Power Supply - single channel. At $15 these are cheap enough to get one for each mic requiring phantom power.
Brass Instruments
Trumpet/Trombone/Sax - Shure PGA98H-XLR
Mic Stands
The stands that I've been using at the Jazz on J Street's Jams are the On-Stage MS7701B tripod with boom LIKE THIS ONE FOR $30
For specialty situations (Like using dual mics on the vibes) I use a combination of a dual mic mounting plate LIKE THIS ONE
And 2 scissor boom arms LIKE THIS ONE
Microphone Cables
There's no need to spend $30 or $40 each on good quality cables. ThePro Co StageMASTER XLR 25' microphone cables that I've been using at the Jazz on J Street Jams have proven durable and reliable. If they're not on sale at Musician's Friend for around $12, check the web for other vendors where they're available for around that price.
MUSICIANS FRIEND
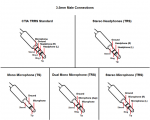
Microphone Placement For Best Sound
There are many opinions out there.
Here's a PDF from Shure, WITH PICTURES, that covers most situations and explains what to expect from a particular placement.
There's also some in depth information for those wishing to go further.
Microphone Comparison Shootout (Sweetwater.com)
Many of the mics that Sweetwater.com has compared in this article are well above our target $100 price point, but you may find some interesting results in this series of Microphone Comparison Shootouts. The real bonus is that each mic is accompanied by a recorded sound sample, so you can compare them all in an actual recording environment.
You can access the shootout HERE
There are some other really interesting articles in their InSync series that you can check out HERE
IMAGES |
|
|
Headphones/Monitoring
What About Headphones And Monitoring? (Overview)
As a professional musician, you should think of investing in a professional quality set of full sized, over the ear sealed studio headphones or a good pair of in ear monitors. You might want to consider a headphone amp to up the volume, and to allow you to mix a musical guide track or a click track playing in the background with the signal that you're recording.
While any earbuds, or wired or Bluetooth headphones, will suffice for listening to a guide track or a click track to record against, they won't allow you to evaluate the sound of your live or recorded performances, especially on a noisy stage.
Bluetooth headphones generally have inferior audio quality compared to wired headphones. To learn more about the limitations of Bluetooth, Read This Article.
Although, if you have a flexible analog or digital audio mixer, you might not need to invest in a headphone amp.
GOING FURTHER
HEADPHONE AMPS
IN EAR MONITORING
FULL SIZED STUDIO HEADPHONES
Headphone Amps
Behringer AMP800 Headphone Amp (new)
Behringer AMP 800 Headphone Amp (refurbished by Behringer)
In Ear Monitoring
MEE 6 Pro in ear wired headphones for $44.99
Or the Shure SE215 Special Edition PRO Wired Earbuds
And here's a $12,73 1/8" (3.5mm), male to female, 25 foot headphone cable extension for your wired headphones, so you can move around freely.
If your in ear monitors come with a 1/4" (6.35mm) plug, you can get set of 2 1/4" to 1/8" headphone adapters LIKE THESE FOR $8.66
Wireless, Bluetooth in ear monitors are not recommended for live performing because of the latency (time lag) you'll experience between live sound and the earbud sound.
Full Sized Studio Headphones
Koss Pro4S Full sized studio headphones $99.99
Audio Technica ATH-M50x Professional Monitor Headphones $149.00
And here's a $12,73 1/8" (3.5mm), male to female, 25 foot headphone cable extension so you can move around freely.
If your headphones come with a 1/4" (6.35mm) plug, you can get a set of 2 1/4" to 1/8" headphone adapter LIKE THESE FOR $8.66
Digital Interfaces - Analog & Digital Mixers
Analog, Digital, And Hybrid Mixers And Audio Interfaces (Overview)
Digital audio interface and mixers with a USB output are used to connect microphones, instruments, and other output devices to the input of your recording devices through a digital connection.
Just as with any other gear, there are many too many choices available and the cost can easily get out of control, without any guarantee that you're getting the 'best bang for your buck'.
First, let's clear up the difference between the basic difference between a mixer and an audio interface.
An audio Interface works as the translator between your microphone or instrument (analog) and your computer, tablet, or phone (digital) Although an audio interface can combine multiple microphones (or instrument sources) together, it generally offers only rudimentary control over them, and the price for quality goes up quickly.
A Mixer, also combines the signals from multiple microphones or other input devices together. The important difference is that in a mixer, you have much more control over the individual audio signals, add effects such as Equalization and other signal shaping tools. Now that many mixers also can act as the analog to digital translator between your audio sources and your computer, tablet, or phone, you tend to get much more bang for your buck.
An (old school) analog mixer does all of it's signal adjustment and processing in the analog domain. This tends to make them bulkier and heavier then a Digital mixer. They often offer less flexibility then an equivalent hybrid mixer and the connections from them to your recording device are generally less resistant to induced noise.
A hybrid analog mixer, offers one important difference. It has a built in analog to digital converter that outputs a digital signal, directly to your computer, tablet, or phone. Often some of the signal shaping can be done in the digital domain and their output connections will be highly resistant to induced noise. These start to offer more 'bang for your buck' then a straight analog mixer.
A Digital mixer converts your analog microphone and other input audio to a digital format right from the start. A digital mixer does all of it's processing in the digital domain, and then outputs both digital and analog audio signals for various purposes. most can connect directly to your computer, tablet, or phone and other recording devices. Some offer wireless control by a laptop computer, tablet, or phone.
A caveat is that a really cheap piece of gear will not cut it. They have noisy circuitry, poor analog to digital converters (for the digital ones) and generally have unbalanced input and or outputs that can prove to be a problem. You can learn more about the problems with cheap gear by reading on line reviews, or just stick with quality.
My own personal bias is to go with either a hybrid mixer, or even better, with a completely digital mixer, and bypass the audio interface route (for all but the simplest implementations).
Here's an important questions that can help you decide on the best purchase.
How many microphones and other inputs do you need to be able to combine at one time. If you're using this for personal recording use then you'll only need a few microphone inputs and a few inputs for other devices, like an electric piano, or a guitar or bass amp, or a player for backing tracks. If you're going to play with a group (now or in the foreseeable future), then you'll need enough inputs to accommodate all of the players.
You can certainly learn more about this topic on your own (YouTube), but let's dive into some suggestions in the next few FAQs. I'm focusing on Behringer products here, because I've been using them for many years and feel that they manufacture a robust product that offers superb audio and build quality at affordable prices. Behringer also offers factory refurbished equipment at: https://www.ebay.com/str/Music-Tribe-Factory-Store at prices sometimes well below retail.
CAVEAT: when mixer manufacturers talk about 'inputs' they are talking about the total number of inputs available, not the number of microphone inputs available.
GOING FURTHER
SMALL ANALOG / HYBRID MIXERS WITH DIGITAL USB OUTPUT
DIGITAL MIXERS CONTROLLED BY TABLET/PHONE/COMPUTER
BUT MY MIXER DOESN'T HAVE A USB OUTPUT
Small Analog / Hybrid Mixers And Audio Interfaces With Digital USB Output
1 MICROPHONE
Behringer U-Phoria UM2 USB Audio Interface (least expensive choice)
Behringer Xenyx Q502USB 5-Input 2-Bus Mixer with Digital USB output
2 MICROPHONES
Behringer Xenyx 802 Premium 8-Input 2-Bus Mixer (2 microphone channels)
Behringer Xenyx Q802USB 8-Input 2-Bus Mixer (2 microphone channels) with Digital USB output
4 MICROPHONES
Behringer, Xenyx 1202FX 12-Input 2-Bus Mixer
Behringer Xenyx X1204USB 12-Input 2/2-Bus Mixer with Digital USB
6 MICROPHONES
Behringer Xenyx X1222USB Premium 16-Input 2/2-Bus Mixer with Digital USB output
Digital Mixers Controlled By Tablet/phone/computer
These start to get a bit pricey, so if you want one, check Amazon.com for renewed or amazon warehouse deals, eBay.com for open box with a manufacturer's warranty, and the Behringer Refurbished Factory Store for the best prices. And don't overlook extended warranties. Be careful with used equipment sales of these items, more than likely they're out of warranty and could have hidden issues that can be costly to repair.
4 MICROPHONES
Behringer XR12 12 input
8 MICROPHONES
Behringer XR16 16 input, 2 channel Digital USB output
16 MICROPHONES (the one I've been using for the Jazz on J Street Jams, just so you know, I got mine for around $450, as a open box with warranty on eBay and it was well worth the wait)
Behringer XR18 18 input, 2-18 channel Digital USB output
But My Mixer Doesn't Have A USB Output
No problem, you can always use the analog output of your mixer and connect directly to the microphone input of your Device. Usually microphone inputs are monaural (one channel) not stereo)
There are also some inexpensive stereo audio to USB converters on the market (although they all say they're for a PC) . The caveat here is that most require a microphone level input. You'll need to take a look at some of the options listed under the 'Audio' topic Connecting Your Instrument, Or Keyboard To Your Device
Here's the one that I've been using for Streaming the JOJS Jam sessions (into a PC Laptop).
Vantec NBA-200U USB External 7.1 Channel Audio Adapter (Windows)
Sorry I can't find one that specifically mentions iPhone or iPad.
With the right set of adapters and a breakout cable to convert the stereo audio from your mixer to an 1/8" trs 3.5mm) plug, (and the appropriate adapter for your tablet or smart phone if needed) your good to go.
Settings-Android
What Setting Should I Check On My Android Devices Before Collaborating/recording?
DISABLE NOISE REDUCTION
Go to Settings.
Select Applications
Select Call Settings
Scroll down to the Noise Reduction option and disable it.
Restart device
USB
If you're going to be using a mixer or audio interface with a USB you'll have to change some USB AUDIO SETTINGS
Go to Settings > About phone > Build number. ...
Tap the Build number seven times. ... (no you don't have to spin around or pat your belly)
Go back to Settings, where you'll now find a Developer options entry near the very bottom of the menu.
Enter Developer mode
Scroll to USB Configuration
Tap USB Configuration and select Audio Source
Also note that many Android devices (especially older ones) have limited or no USB support. If you think that's your issue, then check out the Audio Evolution mobile extreme USB driver HERE Their driver comes packaged in a simple to use audio editor and they've also got a iOS version.
MONITORING
Under some headphone or earbud monitoring situations, you might want to adjust the AUDIO BALANCE (Left & Right)
On Android 4.4 KitKat and newer, go to Settings and on the Device tab, tap Accessibility. Under the Hearing header, tap Sound balance to adjust the left/right volume balance. Below that setting is a box you can tap to check to enable Mono audio.
Settings-iOS
What Settings Should I Check On My IOS Device Before Collaborating/recording?
MONITORING
Under some headphone or earbud monitoring situations, you might want to adjust the AUDIO BALANCE (Left & Right)
In iOS 9.3, head to Settings > General > Accessibility. Scroll down to the Hearing section and you'll see a slider for left/right balance. Move the slider to the side where you would like to increase the volume level.
For many audio sources, stereo sound features different sounds and levels in the left and right channels. With mono sound, you'll hear the same sounds in both channels. Above the volume balance slider on the Accessibility page in Settings is a toggle switch to enable Mono Audio.
Smart Phones and Tablets (all)
Mounting Your Phone Or Tablet On A Tripod
A Lightweight 50" Camera Tripod 50 Inches LIKE THIS ONE
A Tablet and Phone Tripod Mount LIKE THIS ONE
Seeing What You're Shooting While Using The High Quality Back Camera On Your Phone Or Tablet
in depth tutorial on screen mirroring that explores many options
And here's a low tech solution that might work for you (a mirror):
A Lightweight 50" Camera Tripod 50 Inches LIKE THIS ONE (also good for mounting your phone or tablet)
A Tablet and Phone Tripod Mount LIKE THIS ONE (also good for mounting your phone or tablet)
And a Rectangular Hand mirror from Target, Publix, the Dollar Store, etc. (use the tripod & mount to position the mirror so you can see your smart phone screen enough for framing)
Audio
Setting The Optimum Recording Volume
Being able to adjust the recording volume level of a microphone, or instrument that’s directly connected to your video recording device is key to insuring that you are recording with adequate volume and without distortion. (If you’re using a USB audio interface or USB mixer, they already have level control built in.)
Here are 2 important things to understand in order to get really good instrumental or vocal recordings.
1) Most smart phones and tablets default to using automatic gain control (AGC) to squash louder audio and turn up softer audio. They also may introduce some filters in an attempt to reduce background noise even further. This may enhance the legibility of the spoken words, but at the expense of full frequency recording and wide dynamic range. This seems to work for speech recording where legibility is more important then quality, especially in noisy locations, but it can destroy an otherwise perfect music recording. You should turn off this automatic control your audio any time you're going to film.
The on-off switch(s) might be in your device settings, or in the recording application that you end up using, or both. Sorry, you'll have to depend on Google for information on how to do that on your specific device/video recording app combination.
2) All of the apps below have some sort of audio level metering system built into them to indicate when your audio signal is either too low or too loud. (low means more background noise when the low signal is turned up to a normal level, and too loud can mean an extremely distorted recording which can't be fixed.
Some meters only use the two colors green, and red, others add a third, yellow color to the mix. Think of these like the corresponding traffic light colors. Try to keep your loudest audio levels bouncing in the upper end of of the green area, or just entering the lower part of the yellow area. If they enter the red area, that indicates distortion.
That's where ability to adjust the recording level comes in. You can adjust your audio levels so that they never enter the red part of the meter, without compromising your musical style.
There are only a few video recording apps available that allow you to see and adjust audio levels, and you may already be using one.
** If you’re using one that you’re happy (or unhappy) with, or you have issues with one of our suggestions below, please let us know at streamteam@jazzonjstreet.com and we’ll add your thoughts to the list.
If not, here are a some that we found so far:
FILMic Pro is a $14.99 video recording app that allows you to adjust audio recording levels along with many video parameters as well. It’s available for both iPhone, iPad and Android devices, but may not be compatible with older Androids.
MAVIS (Free to $17.99) is another really good camera app for the iPhone with easy audio controls.
And thanks to some testing by Pianist Mari Mennel-Bell we can now include the free ShurePlus Motiv Video Recording App for iPhone and Android devices. It was created by the same company that has been making professional microphones for decades and can be found on the App store and Google play.
Glossary Of Audio Terms
Not sure what a term means? Find out here.
Video
Filming Like A Pro With A Smart Phone, Tablet, DSLR, Or Webcam
Once you’ve got your gear in order (microphone(s), camera or other filming device, tripod and phone holder, lights, mirror, instrument(s)) there are some general rules that will give you better results.
CAMERA ORIENTATION
A lot of you will be using your smart phone as your camera, and that's certainly a viable option since the rear facing camera (the one on the back of your phone) is usually pretty high quality. If you plan to use your smart phone, regardless of anything else that you do, please, hold your smart phone horizontally, so that the image is wider than it is tall, and it can fill the screen on a laptop/desktop/tablet. That said, read on...
CAMERA QUALITY
The better your camera, the better the video. If at all possible, use a DSLR, a quality webcam, or the rear facing camera on your smart phone or tablet. (The front facing camera on your device records much lower quality video.)
NOTE: To use the rear facing camera, you can reflect enough of your devices’ screen in a glass mirror to insure that you are ‘framed’ the way you intended. Or you can use screen mirroring to a TV or monitor, if that’s available.
USE YOUR DSLR AS A WEBCAM
CANON
In April 2020 Canon released their free EOS Webcam Utility Beta . a utility that allows a large range of Canon cameras to be used as a webcam on both a Windows or a Mac platform.
This can be a real game changer because it allows the direct connection of your camera to your computer through a USB connection. This means no more need for an HDMI to USB capture card that can cost hundreds of dollars. This utility is still in Beta, so some of it's limitations (like not working with Skype) and a growing camera camera compatibility list are changing with each new release. Here's a YOUTUBE VIDEO on the utility.
NIKON
According to Nikon, this method is ideal for those seeking a high quality video stream with the simplest setup and no additional hardware.
- Connect your Nikon camera to your computer using the USB cable that was included with your camera.
- Download and install any third-party conferencing/broadcasting software that is compatible with both your Nikon camera and your computer’s operating system.
- Software like Ecamm Live (Mac), Vmix (PC), SparkoCam (PC) have compatibility with select Nikon cameras via USB and can seamlessly connect to streaming applications like Zoom, WebEx, Twitch, Facebook Live and others.
VERY IMPORTANT
No matter what recording device you’re using, clean the lens before you start recording.
RECORDING QUALITY
You should always be filming with your camera in the horizontal position. That way your videos will fill a 16:9 screen and allow for the most flexibility in post production.
If there are quality choice available, always choose the highest quality available, although 30fps is fine for performance videos (you don’t need 60fps and it will make your file very big).
If the video format is changeable, it should be set for 1080p (1920x1080 pixels ) using an mp4 container with an h264 codec, and a frame rate of 30 frames per second.
If there are changeable audio settings, you should be recording 16 bit audio at 48 kb/s and 384kbps with an AAC codec.
If Video and Audio formats are fixed, or you’re not comfortable changing them, they’ll probably default to something usable.
RECORDING SPACE
Most of us don’t pay a lot of attention to the space available for storing recordings on our devices. Make sure that you have enough space available for your videos. As a rough guide, you’ll need about 128mb for a 1 minute recording (1GB of free space will hold about 8 minutes of 1080p video)
USE A TRIPOD
Set your camera on a tripod and make sure that you frame the shot to your liking. There are no hard and fast rules, but normally you’ll want horizontal lines to be horizontal and vertical lines to be vertical.
WHITE BALANCE
White balance is the process of removing unrealistic color casts, so that objects which appear white in person are rendered white in your video. Most cameras can use their automatic (or manual) white balance control to do a pretty good job of adjusting the White Balance for a single lighting color, however, it’s important to understand that white balance can only adjust for the overall color in your shot, and cannot adjust for multiple individual colors.
AIRPLANE MODE
If you’re using a tablet or smart phone, put it in ‘Airplane’ mode. That way you won’t be interrupted by unwanted notifications or calls during your recording.
MANUAL EXPOSURE AND FOCUS
Most cameras are set by default to automatically adjust for changing light levels and focus while filming. This can lead to very strange results when, for example, a dark object moves around in the frame or you or your instrument moves around and the camera continually tries to re-focus.
Set your camera to manual exposure (AE lock) and manual focus whenever possible.
LIGHTING
In general, webcams and smart phone cameras react better to relatively bright, even overall light in addition to any other lighting you're using. DSLRs are more forgiving of high contrast ‘creative’ lighting.
Be careful of harsh shadows, and use ‘fill’ lights to make them softer.
WINDOW LIGHT
If you rely on the light from a window as your main source of light, make sure that the light won’t change during your recording session due to clouds or time of day. And, don’t film in harsh sunlight that’s coming through the window. That will create harsh shadows in your video. Besides, the shadows will move over time. Another thing to be aware of is the color of the light caused by reflections outside the window. Grass will make the light green, a large orange building can make the light look orange.
That said, the closer your light is to a ‘daylight’ lighting color, the more natural your video will look (especially in skin tones). The more control you have over the lighting in your shoot, the more consistent your results will be.
ARTIFICIAL LIGHT
Each type of light has its own ‘color cast’. While, daylight is slightly blue, incandescent bulbs give off a yellow light, and non-daylight florescent bulbs give off a yellow-orange light. Both Florescent and LED bulbs are available in ‘daylight’ colors.
If your main source of light is a window (natural light), and you use tungsten lights to fill in shadows in your shot, the camera will not be able to set an accurate white balance, and things like skin tones will suffer.
STUDIO LIGHTS
The most control over the look of your video can be accomplished by using studio lights. Using studio lights doesn’t have to be a daunting, or expensive process. Studio Lights just means that you are using artificial lights to light your ‘set’. The most pleasing results will be obtained by using soft light, that tends to "wrap" around objects, casting diffuse shadows with soft edges. Soft lights can be DIY affairs made from white sheets hung in front of light fixtures, or from cardboard boxes painted white in the inside with tracing paper in front of them, or they can be purchased on Amazon and from a number of other sources. They can be used alone, or to augment existing room lighting.
.Here are some links that might help
Tips for Setting Up a Home or Office Studio (overkill but some good ideas)
20"X28" Soft box Photography Lighting Kit
TEST
Before you do the actual filming, it’s a good idea to make a few short tests, and if at all possible, play those tests back on a large screen using at least good quality headphones or earbuds. It’s very hard to determine video quality, focus, etc. on a small smart phone screen.
ACTUAL RECORDING
Before you break down your recording setup, play back your video (again on a large screen using at least good quality headphones or earbuds) and make sure that you’re happy with the result.
You’re, a professional musician, and you’re competing with all the other performance videos out there. It’s not important that you produce a complex music video, but you’ll want to be proud of the finished product you create.
Glossary Of Video Terms
Don't know what a term means? Here are a few resources to help you:
LIKE THIS ONE
AND THIS ONE
Collaborating With Other Musicians
How To Collaborate With Other Musicians On-line
No matter what approach you take to create a musical collaboration, whether it’s being recorded together live, or your performances are being recorded separately during our current ‘shelter in place’, socially distanced environment, and then mixed together in ‘post production’, there are a few things that remain the same.
It’s always about the music, and all musicians want to sound (and look) as good as they can to their audience.
We’ve already covered the steps required to make each of your individual recordings sound good in other FAQs. In this section, we’re going to describe the basic approach to collaborating by recording individual tracks and combining them together afterwards.
WHY CAN’T WE ALL JAM TOGETHER ON THE WEB IN REAL TIME? - LATENCY
The first, and most important thing to understand is that it is currently pretty impossible for a group of musicians to simultaneously play together using any on-line video conferencing app (Zoom, Google hangouts, etc.).
The biggest reason is latency, which is the time that it takes to move data (your performance) from one place to another. It doesn’t matter how fast your connection is, latency is still going to be an issue, It’s a matter of physics. Any time you send data from one place to another location and then back again, there’s going to be a delay, which most often will be cumulative. Latency is a dynamic situation, since various ‘packets’ of your data will be sent to recipients by different routes over time. If you’re using a smart phone or tablet, or using wi-fi, the latency issues get even worse.
Although it’s possible that a small number of musicians who have high-speed cable internet access and who live near each other, can sometimes ‘get lucky’ and be able to play something in ‘sync’ (less than a 25 ms latency), generally there are too many variables to count on any consistent success.
OTHER ISSUES
In addition, all video conferencing platforms process their audio and video to limit the bandwidth required to use them, and that will degrade the audio quality even further.
In addition, there are no video conferencing platforms that we know of that will allow you to record the individual musician’s performances and adjust their recorded levels afterwards.
OK, I know you’ve probably heard of the Acapella app, JamKazam, or rivals like NINJAM, eJamming, and Jamulus. Some of them are gone, others are trying to stay in business, some are getting close to a usable product, but none of them can totally defy the laws of physics. Here’s an interesting article on the subject.
There are also specific FAQs on our experiences using Acapella and JamKazam.
SO... HOW CAN WE BEST COLLABORATE ON_LINE?
As we’ve seen countless times on YouTube and other streaming services, it is possible for multiple musicians to collaborate on-line and to produce exceptional videos with professional sounding results.
THE BASIC APPROACH TO ANY ON-LINE COLLABORATION
1) The leader or organizer needs to pick a tune, decide on a key, time signature and tempo, choose the musicians who’ll be collaborating, decide where any solos will occur in the piece.
2) One of the musicians needs to video the first recorded track, to act as a guide for the others. It’s usually better to use a polyphonic instrument like a piano or keyboard to create the guide track.
A guide track should contain:
A) A count off, and possibly a metronome track.
B) Sounds that will be used to synchronize all the recordings (a series of claps, short staccato musical notes, a drum hits, etc.)
C) A performance of the entire piece, at tempo.
D) Instructions on how to use the guide track should be recorded at the beginning of the guide track and instructions on how to deliver the finished tracks should be recorded at the end of the track.
Written, and/or spoken instructions on the guide track should include:
A) The technical specs for the project, like 1080p (1920x1080) video with audio at a 48Kbps sampling rate and 16 bits and AAC Audio compression.
B) A reminder to set up their recording device so that the frame is horizontal (wide and short) not vertical (narrow and tall).
C) Communicate any dress code for the collaboration. (we’re all wearing black for this collaboration, etc.)
D) A reminder to make sure they’ve cleaned the lens on their recording device before recording.
E) A reminder to check their microphone placement , recording levels, lighting, framing and the look of their recording environment (Pick up those dirty socks, etc. before filming...).
F) A reminder that before uploading their video, they should name their video file with their name, the name of the tune, the instrument they’re playing, and a take number if it’s not the only time they are recording.
TRACK SYNCHRONIZATION
Additionally, the musicians should be instructed to record their own synchronizing sounds in unison with the sounds they hear in the guide track. It doesn’t matter how they create it, but they should be short, sharp and relatively loud.
NOTE: The guide track is just that, a guide, and should help the other musicians understand what will be expected of them. After the firs round of recordings, some musicians, or the leader might not be the performance that the creating musician wants to appear in the finished recording, and can be re-recorded after hearing the other musician’s tracks (other musicians may want to re-record their tracks as well).
3) The leader then uploads the finished guide track to Google Drive, drop box, or any other file sharing service that can easily be accessed by the other participants (they’ll need to upload their recordings there as well)
4) Each of the musicians needs to download the guide track, and record their part, while listening to the guide track on headphones or earbuds playing from a device other then their recording device.
5) When all the separate tracks have been recorded, the person who will be synchronizing them, adjusting the relative volume of the tracks, and placing the different videos, needs to download all of the videos and begin the process of Post Production.
POST PRODUCTION
The first thing to know, is that almost all digital video and audio editing programs are non-destructive in nature. That means that the original audio and video files are not touched during the editing or manipulation process. Instead, a file of instructions is created for the edit project that tells the programs exactly how to manipulate the edits and all other parameters of the project. You can always undo or change anything that you've done, or start the project again, and your original files will still be intact.
There’s a great, and free, program out there that will make the post production process very easy. It’s Davinci Resolve 16 and it’s available for Mac, PC and Linux based computers (you can’t do this part on your phone or tablet). Download the free Davinci Resolve program (The download link is at the bottom of the page) and install it on your computer.
There’s also a video checkerboard template that we’ve created that can help you to quickly place the different video recordings into your final video. You Can Download It Here Just right click and 'Save As'.
The basic approach to creating your finished collaboration is to:
A) Import all of the videos (including the guide track) and the checkerboard template into Davinci Resolve.
B) Place all of the videos on separate video tracks in the editor (doesn’t matter what order) and the checkerboard template on a track that’s below the others.
C) Switch to the ‘Fairlight’ audio tab in Davinci Resolve and synchronize them by dragging the individual tracks along the time line until the synchronizing sounds at the beginning of each track are vertically aligned with each other.
D) While still on the ‘Fairlight’ tab, adjust the volume of each track so that they sound good together. You can also add any panning, fades, reverb, equalization, compression, and/or any other sound shaping to the tracks a this point.
E) Switch back to the ‘Edit’ tab, and trim the front and back of the video to start and end appropriately.
F) Select all of the video tracks and shrink their size to approximately fit one or more of the boxes in the checkerboard template.
G) Select the top video track and drag it’s position to where you’d temporarily like it to appear in the final video frame, then work your way down the tracks and move them to their temporary position.
H) Highlight each individual track and adjust it’s position an size to where you’d like it in the finished frame. Hint: You can easily resize a track’s image at any point during the performance, so you might want to place a musician’s video in the center and make them larger. during their solos.
I) If you want to create a border of any kind between your musician’s videos, just find and import any image (solid color, pattern, or scene) or a video, place it on a track just above the checkerboard template, and tun off that track’s visibility until you’re ready to use it.
J) When you’re happy with the result, export your video and share it with the other musicians. If they don’t want to re-record their performance, you’re done and you can share the video with the world. If they want to re-record, then import their new video into Davinci Resolve and place it on a new track just above their old track. NOTE: If you can’t see the count off and synchronizing sound of their old track, just drag it’s left boundary towards the left until you can.
K) Switch to the ‘Fairlight’ tab, and drag the new track along the time line until it’s synchronizing sound is vertically aligned with the old track. Then, mute the old track and adjust the audio levels and other parameters of the new track appropriately.
L) Shrink the size of their new video and move it so that it covers their old video.
M) Turn off the visibility of the old track, trim the beginning and end of the new track as appropriate, and re-export the new video (name the video file with a different name from the first just in case, you can always delete the old ones after the final performance is chosen.
DAVINCI RESOLVE TUTORIALS
A Complete Davinci Resolve Tutorial
A Really Good Tutorial on the Davinci Resolve FairLight Module
Creating a Virtual Choir in DaVinci Resolve 16 The subject of this video is a little different, but the process is the same.
Happy Collaborating!
Using Acapella, The Collaboration App By Pic Play Post, (and Understanding Its Limitations)
Acapella by PicPlayPost for both iPhone and Android (although the Android version has not been updated since 2016) is an app that has a great concept behind it. It offers a seemingly simple way for musicians to collaborate, with themselves or others, and to record multiple parts in sync, and then to combine the parts into a finished performance and share the result.
My take is that Acapella doesn’t offer a lot of dynamic audio (or video) flexibility for an app that charges $120 a year (that’s if you want to record over 1 minute projects with good audio quality and 1080p (1920 x 1080) video). It doesn’t feel (to me) like the app was created with the professional musician in mind, but it certainly does have it’s uses.
Before you decide that this is the App for you, I’d suggest reading through some of the negative (and positive) reviews on appgrooves.com
For me, some of the drawbacks of Acapella are that:
1) The app forces you to pick the maximum length of your performance and the number of collaborators before you can begin recording.
2) It also requires you to pick the exact video layout you want to use and where in the layout the musicians are placed, before recording begins, and neither can be changed without starting your project over again.
3) You can only choose between 4 basic time signatures 1/4, 2/4 3/4 and 4/4 although you can adjust your tempo from 60 to 180 bpm.
4) All of your choices are fixed for the duration of the project, so a soloist must remain in the same place in the video layout, even during their solo.
5) There doesn’t seem to be any way to adjust audio levels of individual tracks at different times during a performance either, just one overall adjustment.
To me, these kinds of limitations are a problem, since music performances rely heavily on great sound and compelling video, and flexible post production is where much of that magic happens.
I will admit, that the ability to use a prerecorded guide track (in the paid version) and to hear all of the other musicians performances while you are playing your part is a plus.
However, I believe that in the end, it’s much less of a hassle to record and post your collaborations using a professional approach, then to try to fit your collaborative performances to Acappela’s narrow guidelines.
That said, if you want to learn more, about using Acapella, here are some good video tutorials by Gina Luciani
I don’t agree with her microphone or adapter comments, or her other software choices, but her explanation of Acapella’s good or bad points is very good.
JamKazam, The Good, The Bad And The Ugly
All I (Jerry) can say about JamKazam is that if you can get it to work, it’s a great program, and does what it says it can do (allow musicians to collaborate over the internet in real time, with video, and acceptable latency) most of the time. The proof of this was on May 30, 2020, when JamKazam hosted a 5 hour live concert hosted by JamKazam. 8 bands, half hour sets, with all the musicians playing from their own homes, in sync, and with only a few technical glitches. Here's a link to the concert
JamKazam has recently added a Broadcaster feature to their platform that basically allows a person (preferably not one of the musicians) to totally manage the audio and video coming in from the other musicians.
The 'broadcast' person can adjust the levels of each musician's audio, switch cameras between the incoming video feeds, and stream the finished production directly from their app to the audience.
For their concert, they used the Broadcast feature in conjunction with OBS, so that they could add a host and some graphics to the production. (They blamed their host's sync issues on OBS, but we've not had those issues streaming JOJS jams once the Video/Audio time lag was adjusted for within OBS).
LIMITATIONS
Jamkazam can only be used on a fast mac or windows machine, and with a fiber or cable ethernet connection. (Wi-Fi won't cut it until 5G.) Musicians also need a JamKazam approved digital mixer or audio interface. They claims that the computer's internal audio processing won't cut it either.
NOT FOR THE TECHNICALLY CHALLENGED
From the way they described it, all you need to do is download JamKazam to your computer, and make a few adjustments to optimize your internet access and audio gear and you’re good to go.
The reality is that it’s much more than a quick ‘walk in the park’.
Finding their setup instructions (videos) was the first challenge. It seems that you have to log in to their site, download JamKazam, install it on your computer, and then look under the ‘help’ link for the JamKazam 'support' link, where you’ll finally get to the list of videos. Here’s the link, so you can see the videos without going through all the steps.
Following the setup suggestions in their videos proved to be a bit of a technical nightmare, made more difficult by the fact that most of the suggestions made in the videos are in what amounts to a new language for me, and I assume for most of you.
To get started, you’ll have to make some changes to your advanced router configuration. I can’t prove that something that I did in error during this re-configuration was the reason that I instantly lost my internet connection. Or that I had to spend a number of hours with Comcast tech support (who swears it wasn’t something wrong on their end) to get my internet service and home network up and running. But I’m not willing to try that again.
Then there’s the matter of all of the steps required to get your audio gear/computer setup to work within acceptable latency, jitter and other tolerances. (If they aren’t within spec, JamKazam won’t let you join a collaboration.)
I guess, if your gear is within spec without any tweaking then it’s not so bad, but mine didn’t. Maybe my interface is too old and its latest drivers weren’t compatible with JamKazam, but what ever I tried, (which was mostly guesswork, because I couldn’t find an understandable troubleshooting guide), I couldn’t get within acceptable limits.
It’s (only) slightly easier if you’re on a Mac then on a PC like I am, because most Macs have built in drivers that work with ‘Class Compliant’ USB interfaces and mixers, but there are still lots of settings to tweak.
All in all, I’ve decided to wait until the JamKazam platform has undergone a few more major upgrades.
But still... they deserve applause, because they're starting to make the impossible, possible.
Zoom
Enabling Original Sound In Zoom For Better Sound Quality
ENABLING ORIGINAL SOUND IN ZOOM
Normally, Zoom processes audio to render the what they feel is the best sound for multiple people speaking, but this is not the optimal setup for playing instruments (or actually for almost anything). Fortunately they also have a built in switch that removes much of their built in processing. It's called "Original Sound" and you should make sure it's enabled for any Zoom call while using either an external microphone or an instrument (live, or pre-recorded playback). They also allow you to remove the automatic level adjustment on your microphone.
HERE'S A YOUTUBE VIDEO ON HOW TO CHANGE THESE IMPORTANT SETTINGS
Here's The Original Zoom Article On Enabling Original Sound
And here are a few excerpts from that article:
ON THE ZOOM DESKTOP APP
Sign in to your Zoom App
Under Home> Settings > Audio uncheck “Automatically Adjust Microphone Volume
Finally, if you’re using an external mic or other USB audio interface, make sure that it’s selected in the Microphone and Speaker drop down menus.
Then under the “Advanced” tab, check “Show In-Meeting Options to “Enable Original Sound” from microphone”.
NOTE: Make sure you enable the in-meeting option for original sound.
Client version 4.6 or lower: Enable it in the web portal first, then enable it in the desktop client.
Client version 4.6 or higher: Enable in the desktop client.
Sign in to the Zoom Desktop Client.
Start or join a meeting.
Click Turn on Original Sound in the top-left corner.
YOU CAN ALSO TRANSMIT STEREO AUDIO IN A ZOOM CALL
Here's The Original Zoom Article On How To Use Stereo
ON A ZOOM ACCOUNT
To enable original sound for your own use, sign in to the Zoom web portal.
In the navigation panel, click Settings.
Click the Meeting tab.
Under In Meeting (Advanced), verify that Allow users to select original sound in their client settings is enabled.
If the setting is disabled, click the toggle to enable it. If a verification dialog displays, click Turn On to verify the change.
Note: If the option is grayed out, it has been locked at either the group or account level. You need to contact your Zoom admin.
ON THE ZOOM MOBILE APP
Sign out and sign back in to the Zoom mobile app.
Tap Settings.
Tap Meeting.
Tap the toggle to Use Original Sound.
USEFUL LINKS |
| THE BASIC MEETING CONTROLS AVAILABLE ON ZOOM CALLS |
Adjusting Video For Performers
SET THE FOLLOWING SETTINGS IN 'VIDEO SETTINGS' WITHIN ZOOM.
1. Under ‘camera’, choose the camera that you’re using.
2. Under that choose ‘HD’
3. Under My Video, CHECK ‘Mirror my video’ if when you move to the left, your monitor shows you moving to the right.
4. UNCHECK ‘Touch up my appearance’ (it can make you look really strange at times)
5. UNCHECK ‘Adjust for Low Light’ (again, it can make you look really strange at times). Find a way to use more light, but remember, backlighting is your enemy.
6. UNCHECK ‘Always display participant’s name on their video. (We use lower third graphics and they can visually compete)
7. Turn off video when joining meeting (optional)
8. Always show video preview dialog (optional)
9. Hide non-video participants (like audio only connections by phone) (optional)
10. Hide Self View (optional)
11. CHECK ‘Enable Stop Incoming Video feature’ (optional) (preserves bandwidth and avoids mental fatigue from viewing multiple, active video participants.)
Under the ‘Advanced’ tab
CHECK all boxes and leave everything else on ‘auto’
Wired Ethernet Or Wi-Fi Connection
For music performance using Zoom, a wired ethernet connection to the internet is highly recommended over a Wi-Fi connection. Music performances require much more information to be transmitted then ordinary speech only meetings do. Ethernet connections inherently offer more speed and greater reliability then wi-fi connections. A wi-fi connection that’s too slow or too weak can lead to intermittent video and audio issues.
Most internet gateway (the box supplied by yur internet service provider) have more than one ethernet port on the back of them. Use one of them to connect an ethernet cable that’s long enough to reach from the gateway to the computer that you’re using to connect to Zoom. If you don’t have an ethernet connection on your laptop, you’ll have to get an adapter. Once the ethernet cable is connected, the switch over from wi-fi will be automatic and you’ll get the speed you need for a high quality performance.
Here are some examples of the adapters that you’ll need (overnight delivery through Amazon prime). (CHECK for compatibility with your device):
$13.59 - USB C/Thunderbolt 3 to Ethernet Adapter, ABLEWE Type-C to RJ45 Gigabit Ethernet Adapter
$12.95 - TP-Link USB to Ethernet Adapter (UE306), Supports Nintendo Switch, Windows, Linux, Apple MacBook OS 10.11-10.15, Surface
$13.59 - USB to Ethernet RJ45 Internet Adapter Compatible with MacBook, Surface,Notebook PC with Windows, XP, Vista, Mac/Linux
And some ethernet cables (also overnight delivery):
$14.99 - $17.45 - $21.98 - 50ft, 75 ft, 100 ft Cat6 Ethernet Cable
Hints And Tricks For A Better Zoom Meeting
Large Meeting Survival Tips
How To Raise Your Hand In A Meeting (Zoom)
How To Raise Your Hand In A Meeting (YouTube)
Hints For Running a Zoom Meeting (YouTube)
In Meeting Controls (Zoom)
Hiding non video participants
Seems you can make ‘hide non video participants’ a default under settings > video. (Settings is on the screen where you set up the meeting)
Video Calling Platforms
General Tips For Improving Quality On Video Calling Platforms
By now you've (hopefully) followed some of the suggestions on how to greatly improve the quality of the audio and video for your performances, and have external microphones, lights, and other gear set up for streaming those performances. This same principle can be used for Video chats on any video sharing platform, or remote teaching. Just because you're not performing, you still want to look and sound good, (even when you're just video chatting with family or friends).
Although you've implemented better solutions then some of the suggestions in this article from the folks at Konnekt, it does have some good suggestions that can improve your call quality on any video calling platform, and is well worth the read.
Streaming
All About Streaming Live Performances Like A Pro (2020) - (Overview)
by Jerry Kornbluth (the audio guy)
During my over 50 years in audio post production (yes, that long) I learned that a project can be done either good, fast or cheap, but that you can only pick 2 of the 3.
If you’ve got endless resources, you’ve probably also got lots of experts ready to help you. So, in this guide, I’m going to focus on streaming a professional looking and sounding production without spending lots of money on either production tools or gear.
Instead of offering an in depth course on each tool and each piece of gear, we’re going to share what we’ve learned, and include links to some in depth on-line resources.
At this point, we’re all used to enjoying well produced videos on YouTube and have struggled with some that are poorly produced. We also watch commercial TV and enjoy the level of production that we see.
The difference between a good and a bad program is sometimes very small. Poor video or audio quality, low resolution, uneven audio levels, and lack of production values (titles, masks, clean starts and ends, etc.)
SO WHAT DOES IT TAKE TO APPEAR ‘PROFESSIONAL’?
For openers, if you’re live streaming, an accurate start time is important. (Just think of how you’d react if you tuned into the 6 o’clock news a 6:00 PM and the screen was blank until well after 6 o’clock, or the program was already well underway when you tuned in.)
We’ll talk about more about the common pitfalls later in this guide, but first I’d like to list some of the tools and the gear that you’ll need in order to live stream your event
There are basic 4 components to the package.
AUDIO
You’ll need a way to combine the audio from all of the musicians and performers at your event. That means you’ll need a mixing console that offers sufficient high quality microphone (and instrument) inputs. I learned the hard way, that you’ll need more inputs then you think you will, and had to sell the first mixer that I had and buy a bigger one.
That was actually a lucky thing, because I now use the Behringer XR18 Digital, remote controlled mixer for the pre-covid monthly Jazz on J Street professional Jam Sessions.
The XR18 offers 16 high quality XLR Mic/Line Inputs, a L/R main out and 6 Aux output busses (2 are linkable as a stereo bus output), easy, direct 16 track multi track recording via USB, and numerous other amazing features like 4 effects busses using vst plugins, all controllable wirelessly from almost any tablets or laptops.
This offers the ability to easily create 2 separate stereo mixes, 1 for the streaming audience, and 1 for the house. Each mix is controlled remotely by it’s own separate device. There’s a tablet (and engineer) controlling the FOH mix and another tablet (and engineer) independently controlling the Streaming mix, using wireless headphones. There’s also a wedge monitor for vocals and we still have 3 Aux busses available for other independent, musician controlled wedge/InEar mixes.
In addition, we create 16 track recordings of each Jam (a separate track for each mixer input) using just an old laptop, so that we can re-mix any part of any performance for other purposes at a later date. At only $450 (factory refurbished with warranty) it’s proven to be an unbelievably flexible and powerful value.
There’s no streaming audio output via USB built into the mixer, but a converter like the Vantec NBA-200U USB External 7.1 Channel Audio to USB Adapter is available for around $25 on Amazon.
VIDEO
Either a single camera, or multiple cameras can utilized during your live event. You can use any combination of high quality webcams, video cameras, DSLR’s and smart phones as video sources and these can be fed directly into OBS, our streaming software, and switched live during the event. Or, as is the case at the Jams, James Venable (the video guy) controls multiple cameras through an ATEM Mini switcher by Blackmagic Design ($300), and then sends me the ‘live’ camera feed using a USB cable that plugs into my streaming laptop computer. We’re thinking about adding a wireless smart phone camera through software like ManyCam or the free OBS NDI Plugin from New Tek, to allow for more intimate mobile shots, but that requires another cameraperson and so it’s tabled for a later time.
If you're curious, here's a Youtube tutorial about the NDI Plugin and what else you'll need. HERE'S A YOUTUBE TUTORIAL about the NDI Plugin and what else you'll need. And HERE'S ANOTHER TUTORIAL.
If you’re going to use multiple cameras, you’ll need to consider a separate engineer to control the stream video. If you’re doing your audio mixing job right, you’ll more than have your hands full most of the time, and if you try to control audio and video at the same time, they’ll both suffer.
STREAMING - OBS
The software that combines the audio, video and any production components like titles, crawls, etc, and sends it to our streaming platform (YouTube) is OBS (Open Broadcaster Software), a free, open source streaming and recording program for Mac, PC or Linux that’s been actively updated since 2012.
To date, it’s the most flexible streaming and production program that we’ve found for anywhere near the price, and allows you to create anything from kiss simple to extremely sophisticated video productions of any length, and then easily stream them to almost any major streaming platform (Note: those streaming platforms may not be free) and if you desire, simultaneously record them to your local computer.
Unfortunately, Many of the better OBS tutorials on YouTube are geared for Gamers, but we’ll be including a lot of tips, and links to the best of these tutorials to help you.
NOTE: In order to interface with a computer that’s running OBS Software you’ll need to output both your audio and video to a Digital USB connection. (Mac users may need adapter cables to convert from USB-A style outputs to USB-C/Thunderbolt/Lightning inputs)
A STREAMING PLATFORM
In order for the world to see your live stream, you’ll need to utilize a streaming service (Like YouTube, Vimeo, and others). We use YouTube because it’s free, has no program time limits, and interfaces easily with our website. Before Covid 19 shut us down, we were exploring broadcasting simultaneously to both YouTube and Facebook Live using Cast.io as a distributor.
GOING FURTHER
PRODUCTION
Make your Live Stream Look Like A 'Professional' Production
Legal Stuff (like Copyrights And Licensing)
TECH
Learning To Use OBS (Open Broadcaster Software) Streaming Software
Multi-track Recording From The Behringer X-AIR Mixer Into A Reaper DAW
Feedback Control In Live Performance
Additional Speakers And Time Alignment
Setting Up YouTube And OBS For Your Live Stream
Streaming To Multiple Streaming Platforms (YouTube, Facebook, And Twitch, Etc.) Simultaneously
Current Wiring Diagram For JazzOn J Street Steaming Setup
Our Current Audio Equipment And Fabrication List
Legal Stuff (like Copyrights And Licensing)
Make Your Live Stream Look Like A 'Professional' Production
A live stream is no different then any other live broadcast. Your audience watches many professional streaming platforms, and has grown to expect a certain level of 'production' and professionalism. You can satisfy these expectations by adding a few easy production elements to your stream.
First, nothing says 'amateur' like a late (or early) start to your stream. Make sure that you start your stream on time. It’s handy to have a ‘stream starting soon’ slide that goes live a few minutes before the scheduled start of your broadcast. This also helps to mitigate the variable delay time before your stream is viewable by your audience (we’ve had as much as a 5 minute lag during some streams).
Your broadcast should include an Intro and Title, possibly a logo for your group or band, a crawl for band or group members. If it’s a live panel discussion, there should be cards with the presenter’s names on them (big enough to read on the screen in a medium shot), a 'break' count down video, an end title sequence, (if there are other streams in a series, include a calendar of upcoming streams), and links to find out more information. Since we have a live audience at our Jams, I back my housekeeping and title sequences with recorded small club crowd murmur.
You can, of course, skip all of these production elements, and just ‘go live’, but when is the last time you saw a TV show or good YouTube video look professional doing that?
PRE-PRODUCTION (Before The Broadcast)
It may sound obvious, but the first step in any project is to figure out the requirements of that project.
- Is there a host or hostess? Will you have to cut to them at various times during the show?
- Will more group members join the production or is everyone ‘on stage’ at the start of the stream?
- Are there ‘lower third’ slides that need to be prepared ahead of time?
- Will there be ‘live’ remote guests?
- If remote guests are to appear should you be using masks to frame them if they’re sharing the screen with your host or hostess?
- Where will your guests and hosts appear on the screen?
- Are there sponsor supplied commercials to be inserted in your stream during breaks?
You get the idea. Anything that can be set up and planned for in pre-production will make your live streaming session go more smoothly and decrease your stress level during the event.
None of the pre-production steps is difficult, they just require a bit of planning.
POST PRODUCTION (After The Broadcast)
After your stream has ended, there's still a bit of work to do if your stream will be be archived on any of your streaming platforms or on your website.
You should, at the very least, trim the beginning and end of the video so that any start delay or housekeeping issues are eliminated. You can also eliminate any unintended or distracting internal elements on-line with YouTube, but not on Facebook. For example, before archiving the Jazz on J Street Jam Session videos, the 20 minute 'On A Break' countdowns are edited out. YouTube offers more on-line editing options then Facebook, but you can quickly trim the beginning and end of your video on-line on both platforms without downloading your video.
Facebook Trim Tools
YouTube Video Editor
If you need more editing options, you can always download and edit your video off-line using a free, full featured video editing program like Davinci Resolve , then re-upload it to YouTube and some other platforms. Sorry, you can't re-upload a live video on Facebook.
Some Helpful (Free or Almost Free) Resources
Predominantly made for Live Streaming in Churches, THIS TUTORIAL has some great ideas for making your stream look more professional. (Although I don't agree with his suggestions in his other video on how to get streaming quickly. )
Free Video Downloader
Lower Third Templates from Envato
Green Screen count down timer
Creating a count down time in OBS
Lower third png templates
Plugins for OBS
OBS Optimization
Lower Third Tutorial-OBS
Zoom and OBS
Build Your Own Streamdeck
Some of the Best OBS Plugins
MUCH MORE TO COME...
Learning To Use OBS (Open Broadcaster Software) Streaming Software
Although he's predominantly a gamer, EposVox has some of the best YouTube tutorials on the subject. Here is a list of his tutorials
There's also a comprehensive wiki on the OBS Website that's well worth checking out.
And here's a tutorial on optimizing OBS for streaming
Multi-track Recording From The Behringer X-AIR Mixer Into A Reaper DAW
One of the great features built in to the Behringer XR18 Digital Mixer is that you can feed up to in the signal processing chain. This allows you to record individual raw (or processed) signals from each channel strip and do a proper mix later.
The recording process doesn't take a high powered computer either. I've been using an older, relatively slow laptop to record 16 tracks plus L/R at 48K 16Bit into a Reaper DAW with no issues.
If you're using a Mac you don't need any drivers for Reaper, but on a Windows machine, you'll need to install the ASIO4ALL driver that you can download from HERE
Here's a YouTube video that explains the setup process. What he left out is that after you've set up your XR18 and Reaper, you might want to save the XR18 setup as a scene preset and the Reaper setup as a project template so that you don't have to go through them manually each time.
Feedback Control In Live Performance
Feedback Control is key in any live mixing setup, especially where a performers are using wireless mics and wandering the stage. I’ve been using the Behringer Feedback Destroyer Pro FBQ2496 for years, and have never suffered from feedback issues after I installed it. You might be able to find one that's refurbished and warrantied for much less, at the Behringer Factory Store
Additional Speakers And Time Alignment
Every time you set a pair of speakers in a different location in the audience, there will be a time delay between the musicians, the main house speakers, and any auxiliary speakers. Each one of these time delays contributes to an unfocused and 'mushy' sound for listeners. Some high end mixing consoles have built in digital signal processors to time align speaker arrays, and there are many delay and pitch shifting plugins that can be used to in all digital mixers to delay audio from a set of FX outputs.
Other than that there are only a few affordable solutions to this problem.
I chose a pair of used Behringer Shark DSP110 a feedback destroyer and delay line combination. Although they're not currently being manufactured by Behringer, they still seem to be available new on Amazon. I was able to get mine used for around $50 each on eBay.
Setting Up YouTube And OBS For Your Live Stream
YOUTUBE STREAMING SET-UP FOR AN INDIVIDUAL EVENT
(NOT FOR A STREAM SCHEDULED IN YOUTUBE LIVE)
On the same laptop that's used for streaming, go to http://YouTube.com, log in, and click on the 'Create Video or Post' icon, (the camera icon with a + in the upper corner of the screen), and choose 'Go Live'
Or, go to your YouTube channel at https://studio.youtube.com/channel/your_channel_id
Log in as above, click the 'CREATE' icon in the upper right hand corner of the screen, and choose 'Go live'
Then:
Make sure that 'Stream' is selected from the top of the screen, not 'Webcam' or 'Manage'
Click on the 'Not For Kids' button then on 'Create Stream'
Copy the new 'Stream Key' to the clipboard (the 'Copy' button)
Click on 'Done'
Click on 'Ultra Low Latency'
Start OBS
Paste the new YouTube 'Stream Key' into OBS (OBS > File > Settings > Stream)
Choose the 'Event Starting Soon' or 'Blank' scene as appropriate
Click 'Start Streaming' and 'Start Recording' in OBS
Go back to the YouTube live dashboard and wait for the stream preview to appear.
Click 'Go live' on the right hand side about 1 minute before the Live Stream is scheduled to start
**** Confirm that the steam is live on your web site ****
To end the stream, click on 'End Stream' in the YouTube dashboard and on 'Stop Streaming' and 'Stop Recording' in OBS
YOUTUBE STREAMING SET-UP FOR A STREAM SCHEDULED IN YOUTUBE LIVE)
On the same computer that's used for streaming, go to http://YouTube.com, log in, and click on the 'Create Video or Post' icon, (the camera icon with a + in the upper corner of the screen), and choose 'Go Live'
Or, go to your YouTube channel https://studio.youtube.com/channel/your_channel_id
SETUP
Log in as above, click the 'CREATE' icon in the upper right hand corner of the screen, and choose 'Go live'
Choose New Stream > Schedule for Later
Add description: Life Intersects, Jazz Connects
Upload Thumbnail
Choose “No, It’s Not made for Kids”
Click ‘Create Stream’
Copy Stream Key
Choose Ultra Low Latency
OBS: Paste the stream key into OBS (File > Settings > Stream)
ON EVENT NIGHT
Log in to YouTube Studio at https://studio.youtube.com/channel/your_channel_id
Click the 'CREATE' icon in the upper right hand corner of the screen, and choose 'Go live'
Click on ‘Manage’ and then on the ‘Correct Event’ to bring up the details for that event.
Verify that OBS is running and the correct Stream Key is entered. (File > Settings > Stream)
In OBS, choose the 'Event Starting Soon' or 'Blank' scene as appropriate
Click 'Start Streaming' and 'Start Recording' in OBS
Go back to the YouTube live dashboard and wait for the stream preview to appear.
Click 'Go live' on the right hand side about 1 minute before the Live Stream is scheduled to start
**** Confirm that the steam is live on your web site ****
To end the stream, click on 'End Stream' in the YouTube dashboard and on 'Stop Streaming' and 'Stop Recording' in OBS
Streaming To Multiple Streaming Platforms (YouTube, Facebook, And Twitch, Etc.) Simultaneously
OBS is set up to stream to only one streaming platform at a time. Full disclosure, there is a way to stream to 2 platforms directly from OBS, but they require a super fast internet connection and a very fast computer to achieve, and you won't be able to record your stream locally from OBS at the same time. If you're interested, HERE'S a YouTube video on the subject.
A better way is to use a service multi-streaming like CASTER.IO, where you can easily and dependably stream your event to multiple platforms at the same time. NOTE: There are other multi-streaming platforms, but at the time this was written, castr.io seemed to offer the best price for a dependable service.
Current Wiring Diagram For JazzOn J Street Streaming Setup
We've learned a lot about mixing house sound and streaming the Jazz on J Street jam Sessions over the past years. As we learned new tricks, the equipment we use has changed.
With Steve Tiger's help, we're currently creating 2 separate mixes, one for the house sound, and another for live streaming.
We've learned some important tricks along the way, and we'll be sharing those tricks and adding a detailed equipment list here very soon.
If you're curious about how we hook up the audio and streaming gear (as of 5/2020), the interconnect diagram is below. You can download a copy of the diagram from HERE
IMAGES |
|
|
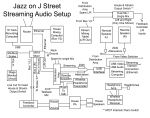
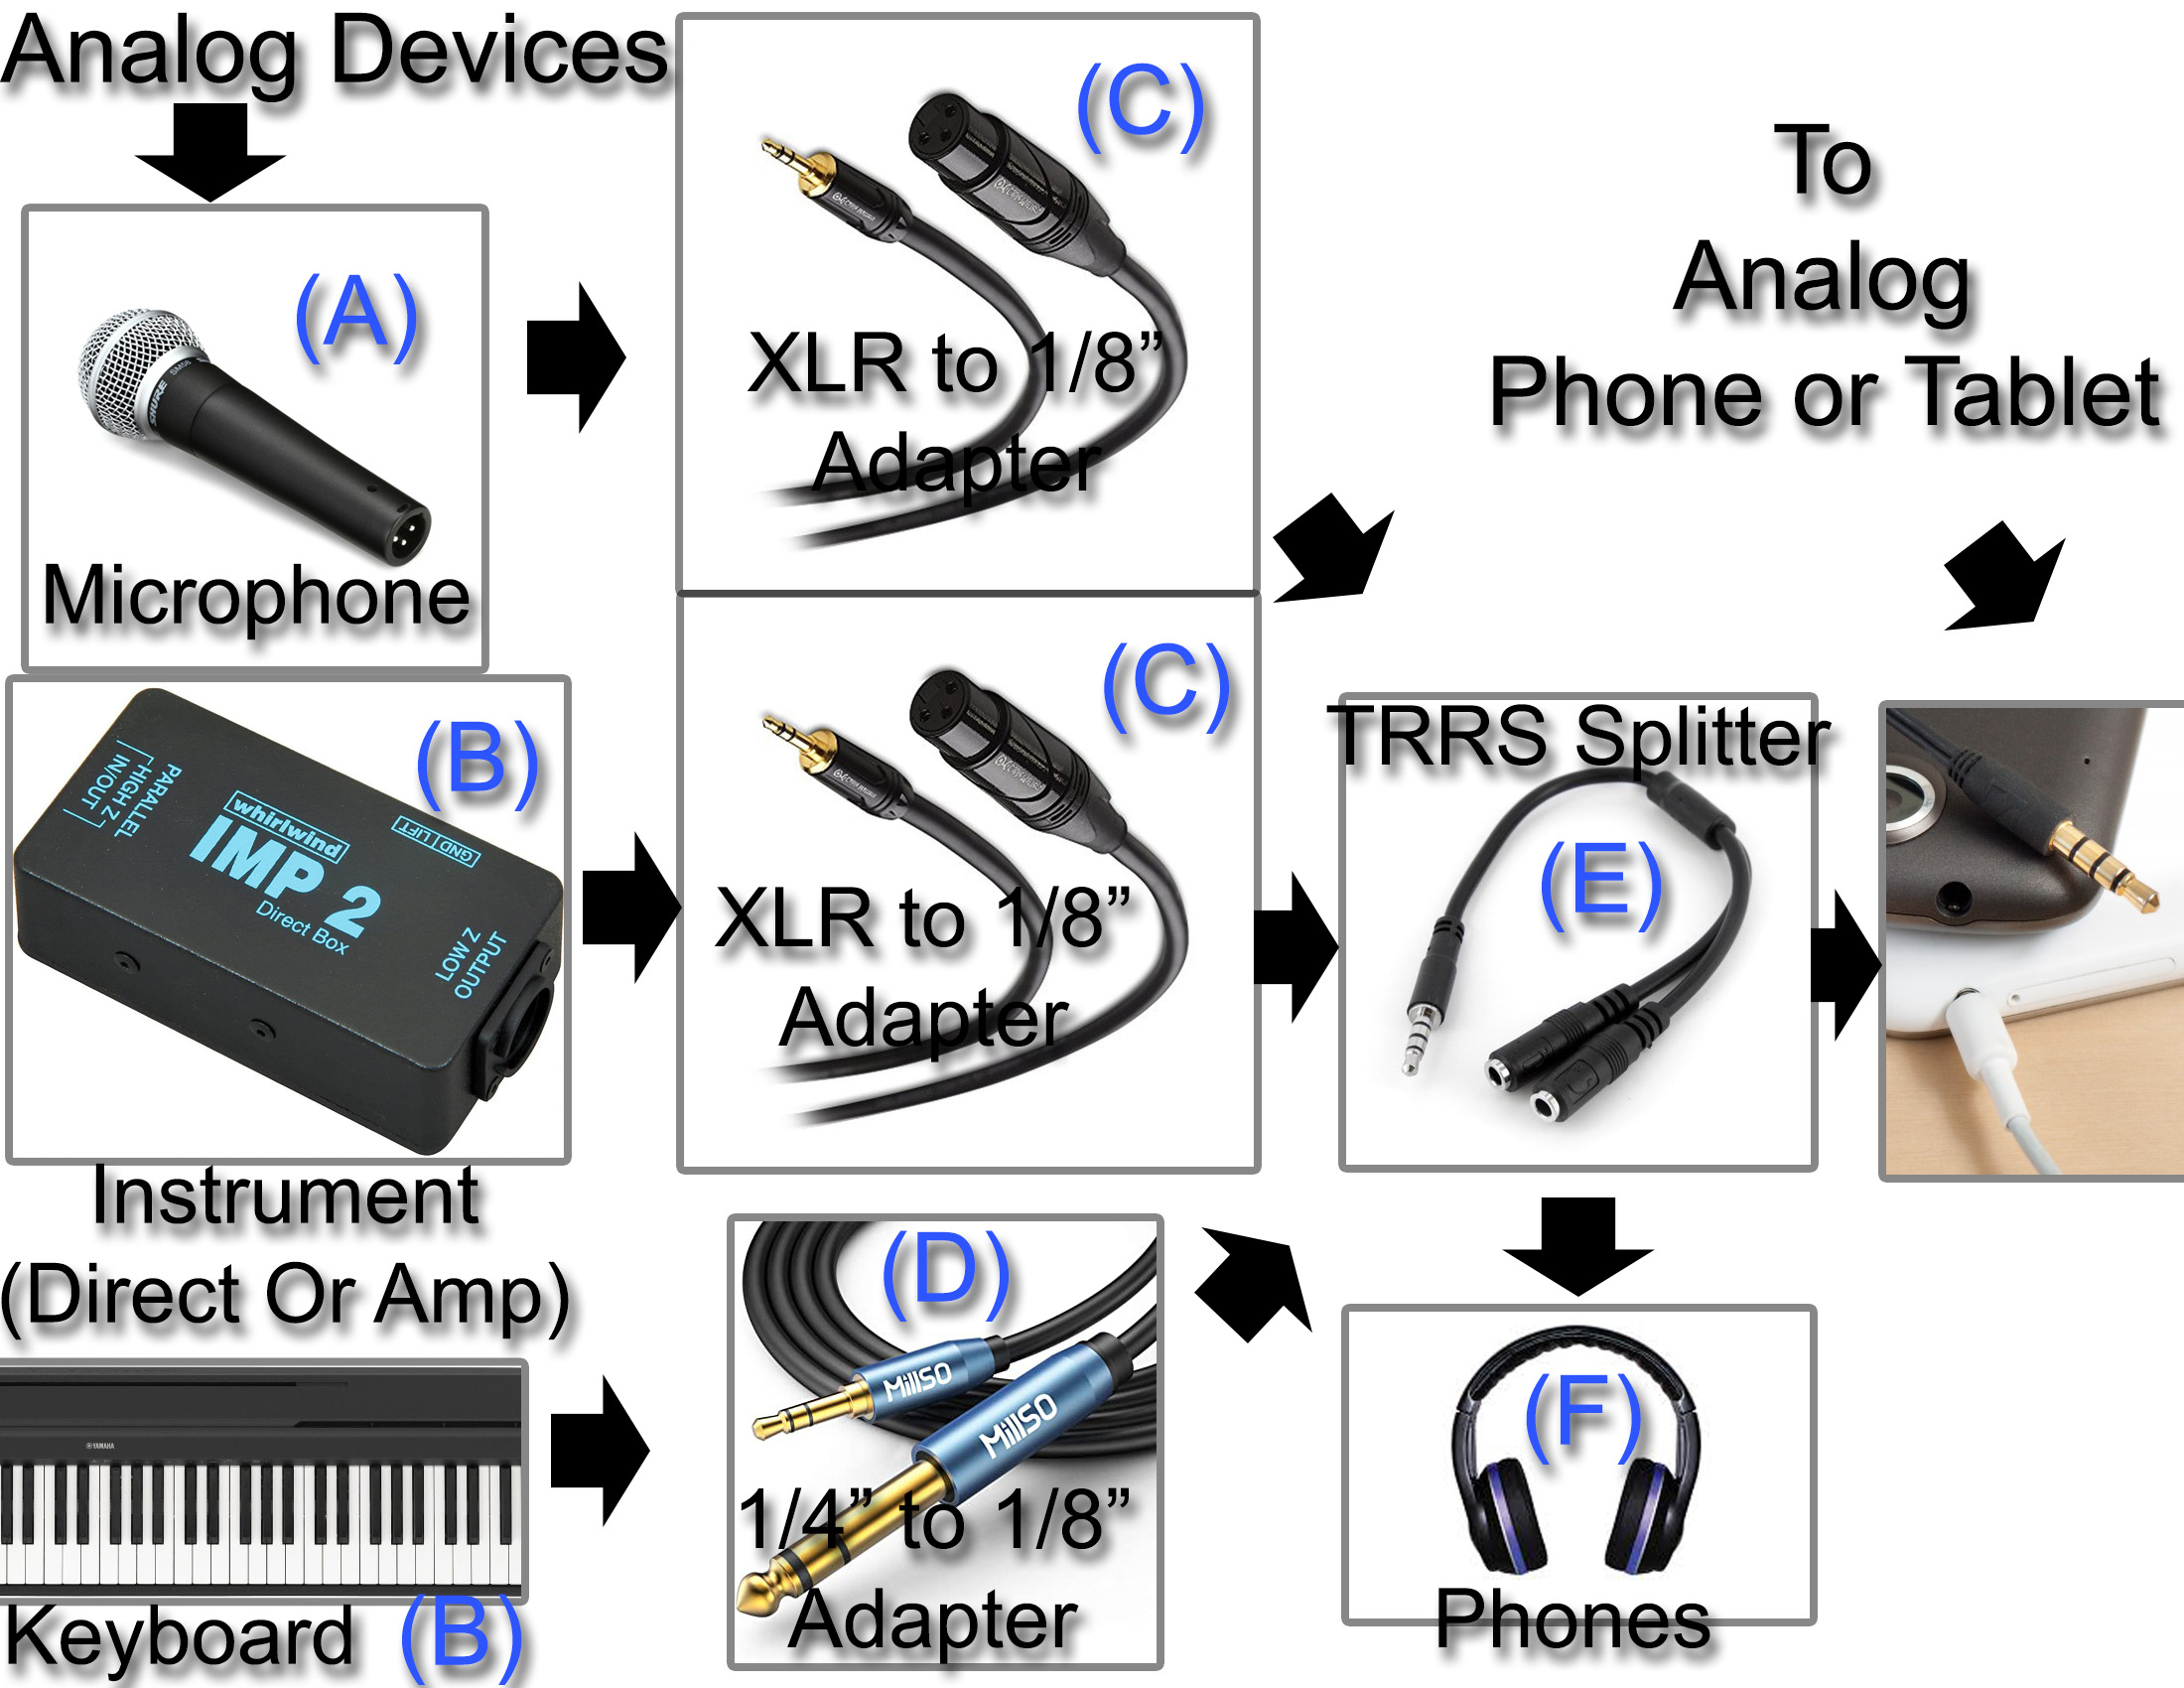
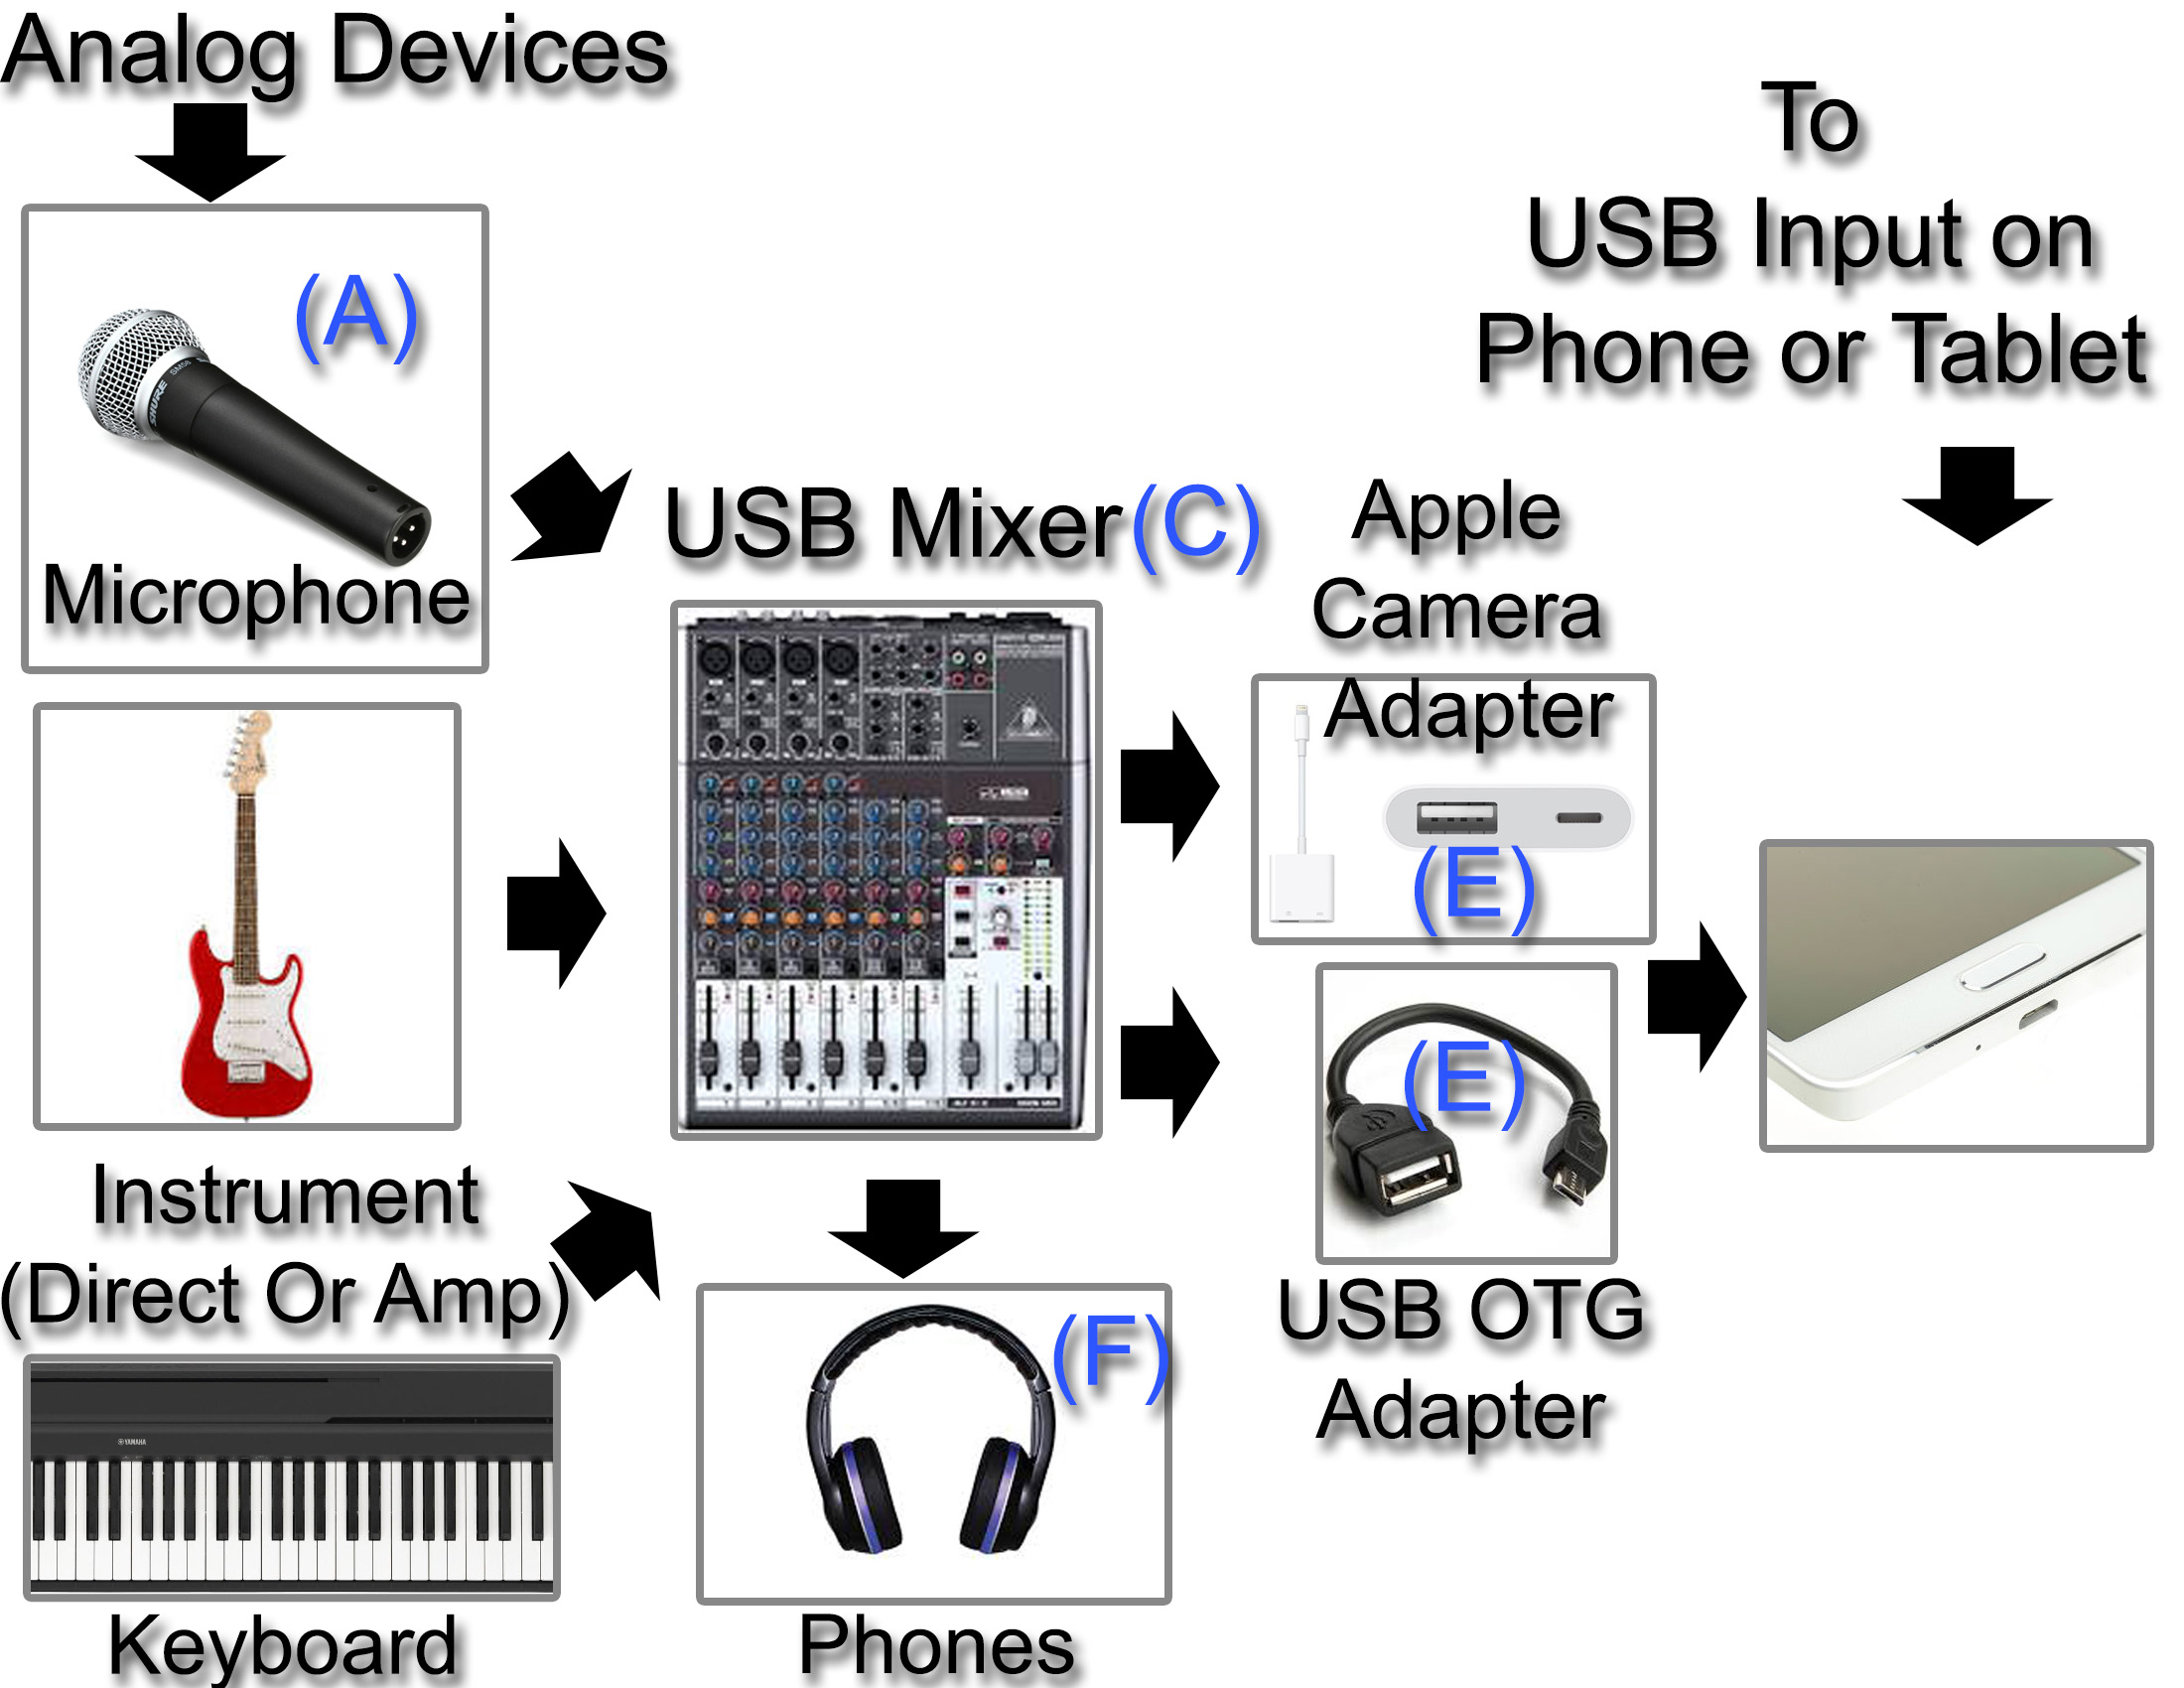
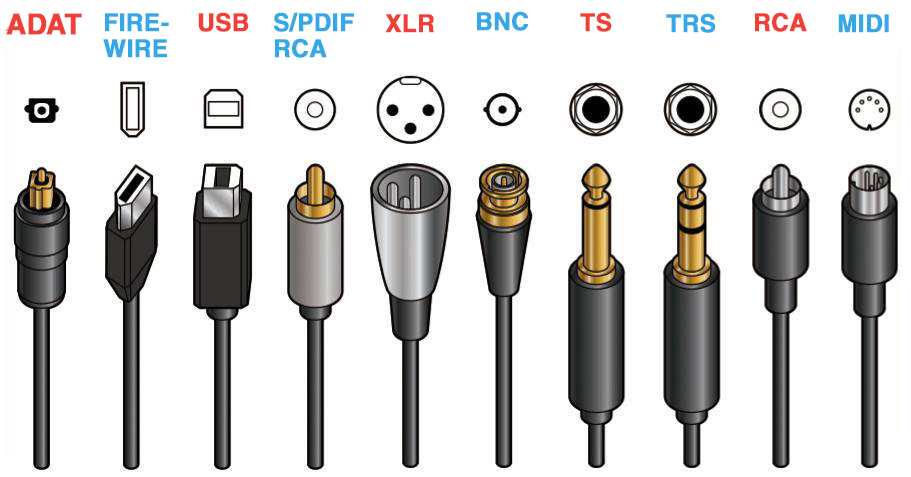
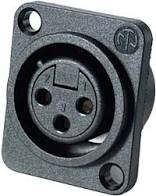
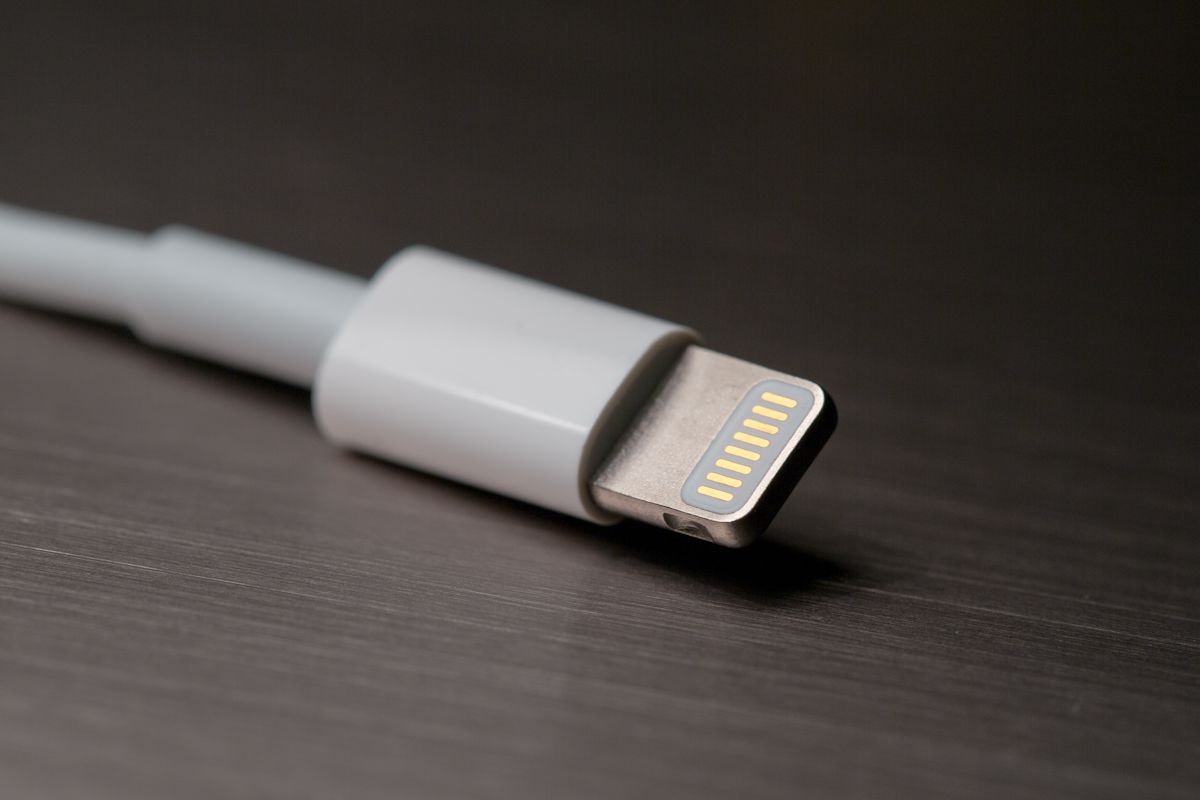
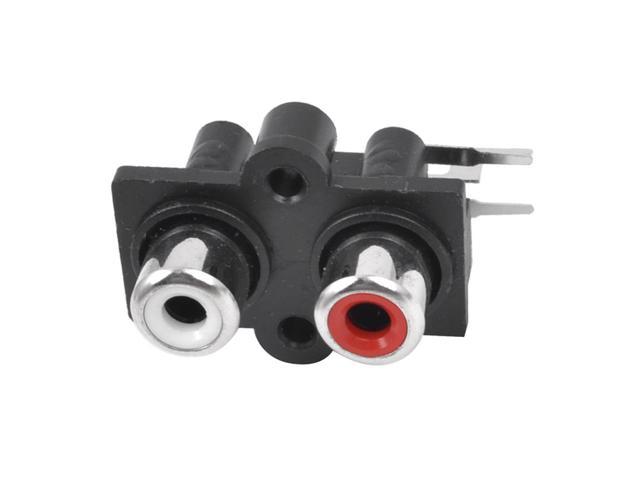
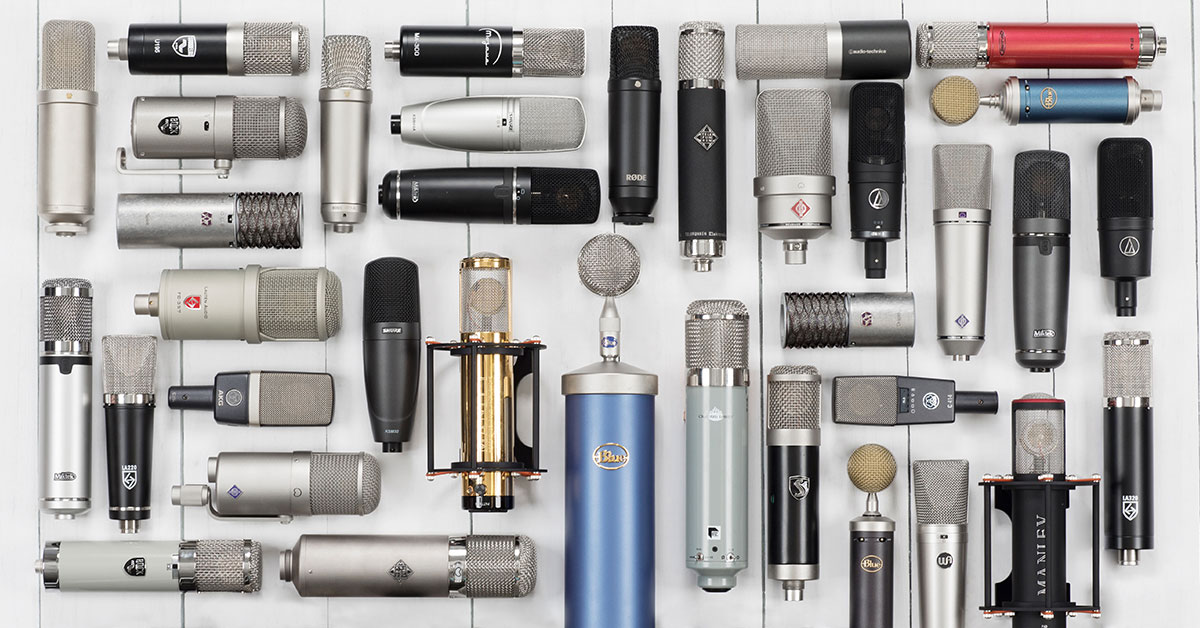
Our Current Audio Equipment And Fabrication List
Although everyone has their own favorites when it comes to equipment brands and models, here's a current list (June 2020) of the gear that we're using in our streaming setup.
1 On-Stage RS7030 Table Top 12U Rack Stand containing:
Behringer X-Air XR18 Digital Mixer
Behringer DS2800 Distribution Amp
Behringer FBQ2496 Feedback Destroyer Pro
2 Sennheiser EW 100 G3 Wireless Microphone Receivers
2 Behringer DSP110 digital delays (mounted on a 19" 1U 6inch Rack Mount Cantilever Server Shelf)
Anleon S2T Wireless Headphone Transmitter/Receiver (for monitoring streaming mix)
Micca Spec G2 Digital Media Player
Custom Termination Panels to bring all connections to front panel.
1U and 2U Procraft Cable Management 19" Rack Panels (pre-punched for 12 and 24 "D" series connectors) (eBay spkrparts store)
Neutrix XLR 3 Pin M and F connectors (Markertek)
Neutrik NE8FDP-B Ethercon D-Series Ethernet Connector
Neutrik NJ3FP6C 1/4" TRS Locking Panel Jack
Neutrik NAUSB-W-B Reversible USB Genderchanger (Type A and B) D-Housing Chassis Connector
Switchcraft EH35MMSSCB 3.5mm 3-Conductor Stereo panel Jack
Monoprice 10ft 4-Channel XLR Male to XLR Female Snake Cable (separated for wiring termination Panels)
In-line Hosa ATT-448 Input Attenuators
Various 1/8", 1/4", Ethrernet and Monoprice 3ft 4-Channel XLR Male to XLR Female Snake Cable (separated for interconnect)
An 8PDT Interlock Piano Switch for switching from single mix output for non music events to dual mix output for separate streaming and house mixes
Microphones:
2 Sennheiser EW 100 ENG G3 Body Pack Transmitters, 2 Shure Sm58, 3 Akg 835, 2 Ultra Lightweight Beige/Black Unidirectional Headset Microphone for Sennheiser Wireless Transmitters, Shure Beta 52A Kick Drum Microphone. 2 Rode NT-5 (matched Pair), 2 Rode M5 (matched Pair), Sennheiser SKP-100 Plugon Transmitter
5 tripod microphone Stands with Boom arms, 2 Table Microphone Stands, 2 Suspension Scissor Mic Stands and Gator Frameworks 1-to-2 Mic Mount Bar (GFWMIC1TO2)
Rockville 16x4 SX1650 50' Snake Cable
2 Custom Kpx112 Speakers
5 Samson Speaker Stands
2 Koss Pro4S studio Headphones
Mini Headphone Amp
Behringer KM 750 Power Amp & 2 x 50' output cables
2 Behringer EUROPORT MPA40BT
Powerwerks PW50 Powered Speaker
Assorted AC Strips, Microphone, Ethernet, and Power Cables, Microphone Cable Adapters, Cases, Spare Parts
Tabletop Riser with headphone amp USB audio Adapter, Talkback switch for mic to stream mix engineer
3 Laptops (1 Lenovo Y-500, 1 HP 17", 1 HP Pavilion Dv6)
Samsung Galaxy Tab A tablet
2 2.5" Backup Hard Drives
1 Hard Drive Docking Station
Legal Stuff (like Copyrights And Licensing)
Legally, you can't just stream anything you've recorded without considering the rights of the music's copyright holders. Things like Synchronization, Mechanical, and Public Performance licensing requirements can be very confusing, but HERE'S AN ARTICLE from easysonglicensing.com that can make the topic a bit easier to understand.
And HERE'S ANOTHER ARTICLE focusing on the Digital Millennium Copyright Act (DCMA).
STAY INFORMED:
Subscribe to our Email list, and we'll make sure that you're kept informed
about upcoming events and other happenings of interest.
CLICK/TAP HERE TO SUBSCRIBE
We Thank Our Sponsors:


© 2025 Greenwich Village Folk Festival Association, Inc. - All Rights Reserved